

Taking on the Chief hike in Squamish seems to be a rite of passage for anyone in British Columbia. Even before we’d got to Squamish, we’d been asked “You’re going to Squamish? Are you hiking up the Chief?!”.
My belief in it being a rite of passage seemed to be confirmed when we saw a school group of fifth graders hiking the trail on the 2nd day of school! Yes, the local school gave these kids one day before they had to take on this brutal hike - I assume that 10 is the age where the rite of passage occurs in BC!
Like just about everyone else, the kids loved the hike. The Chief is one that attracts hikers and non hikers alike, despite being a fairly full on climb. Simply put, the Chief hike has to be on your list of hikes to tackle in Squamish!
Here’s what to expect from the Chief hike in Squamish, which is actually officially called the Stawamus Chief but we didn’t meet anyone who called it by it’s proper name!
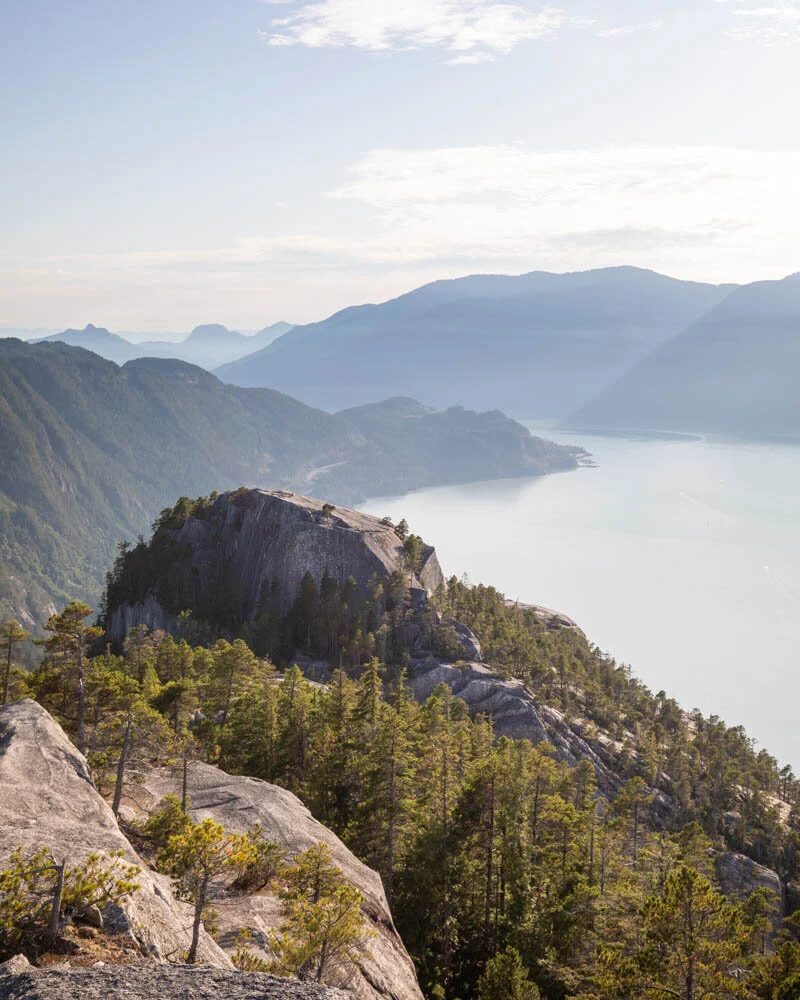
The Chief hike in Squamish
The Chief hike in Squamish
On the face of it, the Chief hike doesn’t look too bad. If you just did the first peak it would come in at around a 6km round trip. What makes it challenging is the elevation which is a whopping 550m in that distance.
Add some patches of scrambling that are so steep that chains have been bolted into the rock and you have a trail that isn’t a walk in the park. There are also two further peaks if bagging one has only left you wanting more. Peak two is tougher than peak one and peak three is the easiest of the lot.
A lot of the hike is also over quite rough terrain - especially if you plan on hiking back from the third peak. The trail has a lot of rock and rubble underfoot and the serious gradient makes the hike slow going.
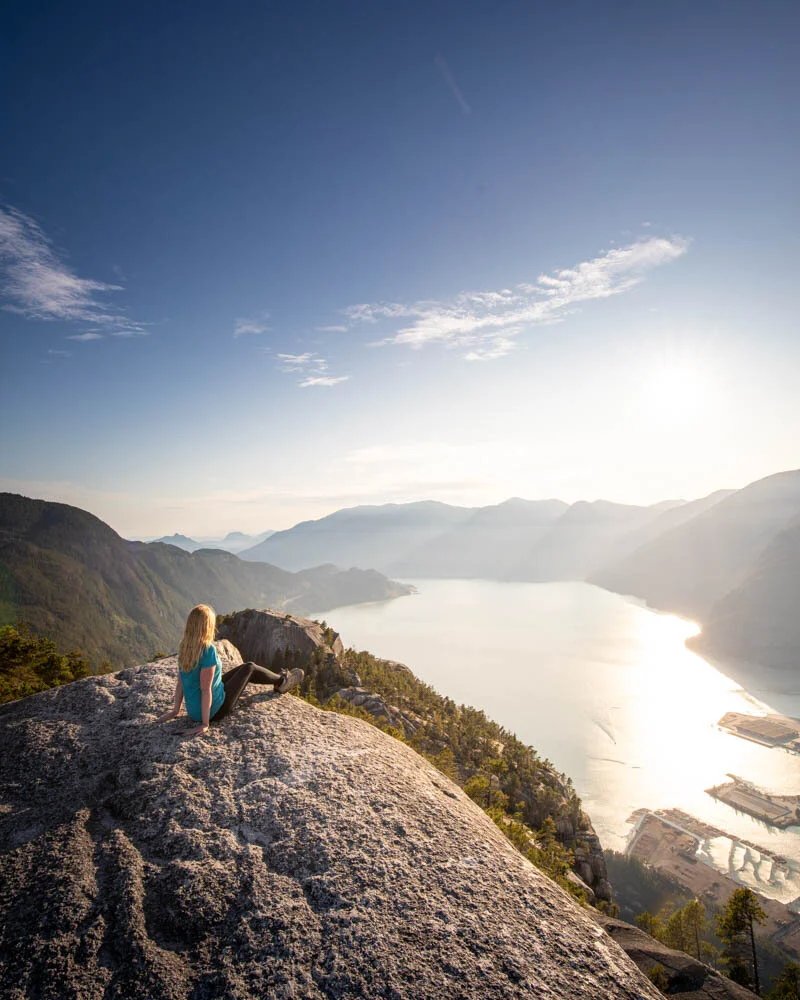
However the tougher the hike the greater the reward and getting to the top and seeing out to the inlet and Squamish town is a great feeling! The majority of people stick to the first peak, but a few chose to take on the second as well (we hadn’t met anyone doing the third peak).
Here’s what to expect from the peaks.
First peak
Distance: 3km (one way)
Elevation: 550m
The hike to all peaks starts from the same path which is about 100-200m from the car park. Your introduction to the Chief hike is manicured (there’s some nice sets of wooden stairs to use) but even these aren’t easy going as there are several staircases in a row.
After this it’s mainly stone steps which felt so steep that they seemed to be made for giants!
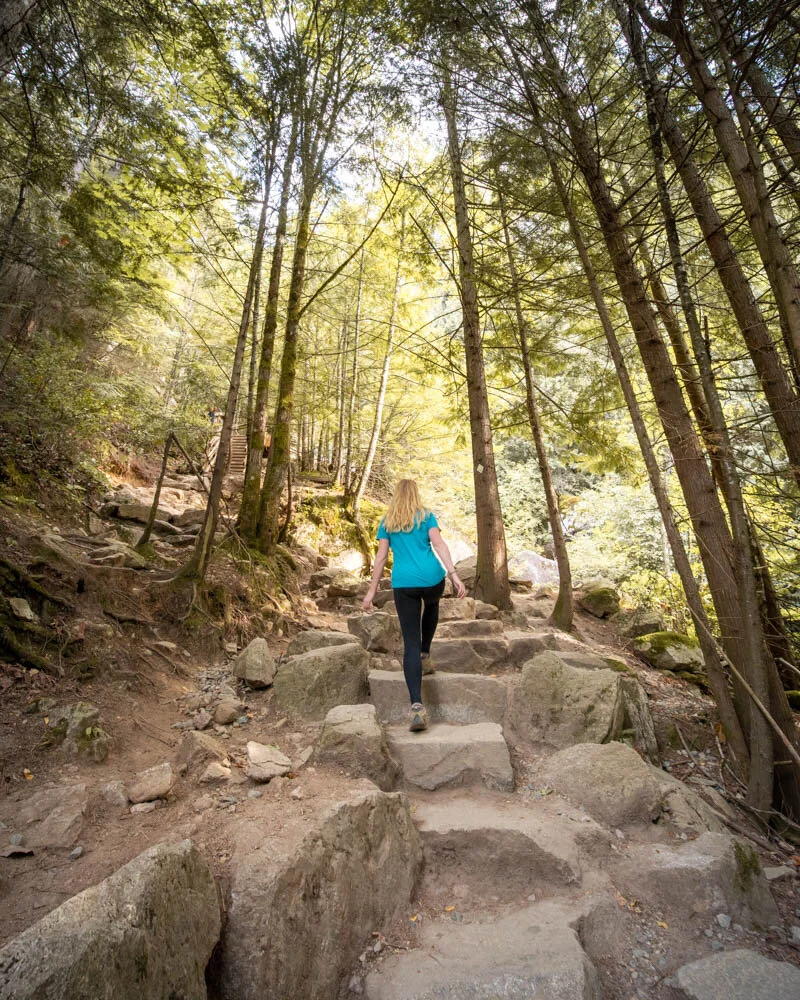
The Chief hike in Squamish: The steps at the start
Within a minute or two you’re feeling the effects of what locals named “the stair master” - the incline has begun and it won’t stop until you reach the top of peak one!
After the staircases, the track becomes rougher (and will continue for virtually the whole time). It’s pretty steep, exhausting and relentless.
Luckily it’s only about 2km to the chains and it doesn’t take all that long. There is one easy and very stable ladder to climb before you hit the section with the chains.
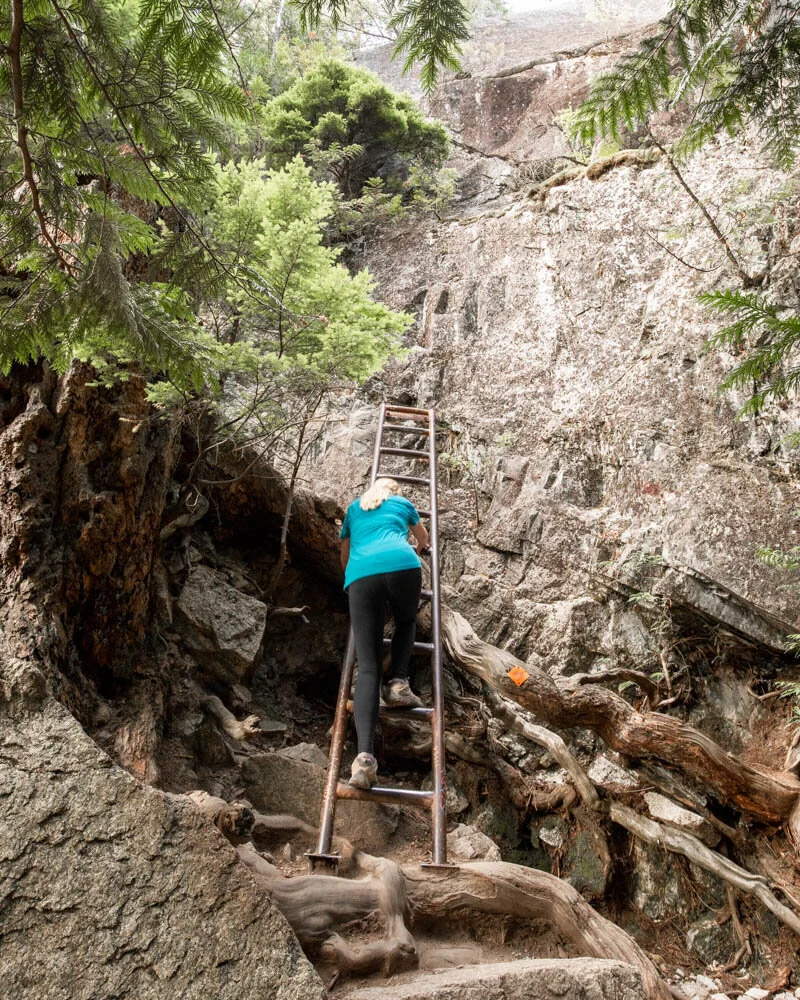
The Chief hike in Squamish: The ladder on peak 1
Read next: Joffre Lakes Hike - Vancouver’s most instagrammable hike
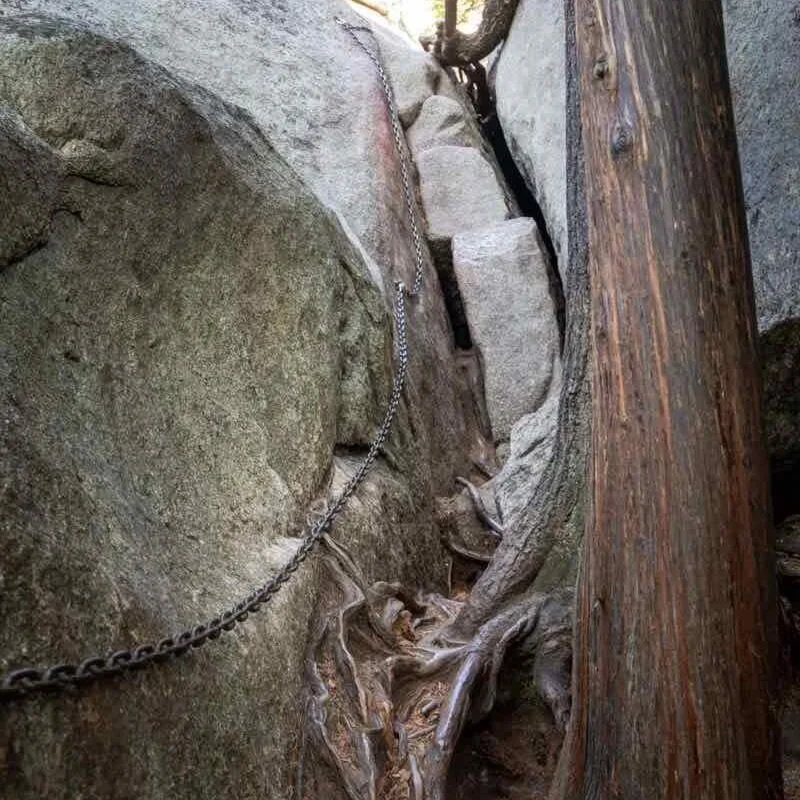
Squamish Chief Chains - First peak
The chains at the first peak are there to help you get up a steep and narrow gully (otherwise you’d be looking at steep slick rock either side!). It’s not that difficult, but the footing can be fiddly. In dry conditions the rock isn’t slippery though and Cat actually found it easier to climb up without the chain just using the tight footing in the gully. The second chain is on a slightly steeper section but again it isn’t too difficult.
There’s also a second ladder which is quite narrow but very stable.
The Chief hike in Squamish: The chain on peak one

The Chief hike in Squamish: The second ladder on peak one
Keep an eye out for the reflectors that mark the trail as it can be easy to lose track of where to go. From the chains it’s a walk up to some trees that you think are near the top, only to realise it’s a false summit!
Then it’s a gradual uphill climb on rock to the true summit for some great views! The rock is nice and grippy in good weather and though it is steep it’s fairly easy to get up.

The Chief hike in Squamish: The last push to the summit
Read next: Things to do in Vancouver Island for a trip of a lifetime
From here you can see the inlet, Squamish town and the second and third peaks nearby. Most people choose to just do the first peak and head back, but we’re gluttons for punishment and continued on.
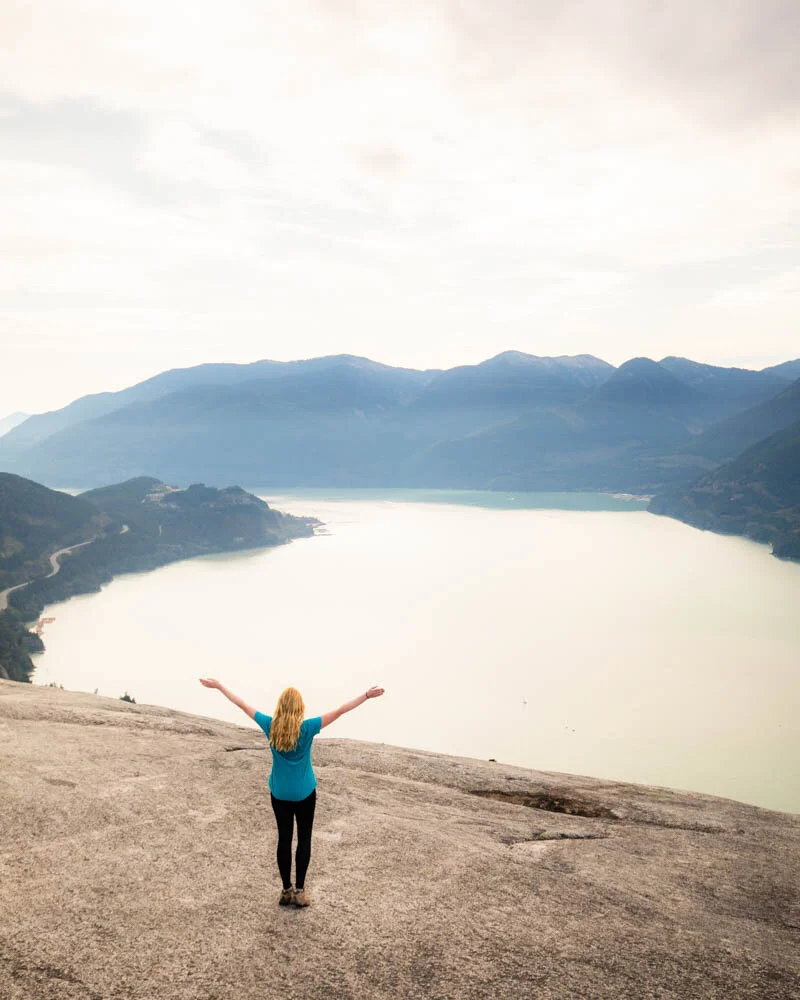
The Chief hike in Squamish: The summit of peak one
Read next: The High Note Trail - hiking on the top of Whistler Mountain
Second peak
Distance: 2km (from peak one using the official route)
Elevation: 215m
There are a couple of options for getting to the second peak. The official route and then the unofficial, unmaintained via ferrata style route. We’ve heard many tales of the unofficial route being on the death defying side of hiking so we decided to go with the official option. If you want to take the dodgy route you don’t descend the way you came you use the metal rungs driven into the cliff by the peak summit.
Back onto the offical route and the second peak is a lot harder than the first as it requires a lot more scrambling and has a particularly difficult section to climb over. Whilst most people can definitely do it, you may want to give yourself some time for the scrambling.
You can easily hike the second peak in combination with the first peak. Heading back down the way you came you’ll see signs to the second peak which leads up a gap between the peaks which is steep and gets more narrow along the way. The path is rocky in parts and requires some scrambling to continue up but there are loads of tree roots to grab if you need. Then before long you’re at the chains for the second peak.
Second Peak chains
The first two sets of chains at the second peak are there to help you get across the narrow paths. They’re not too hard, but the chain makes it easier for your balance and staying on the track. Then comes the hardest part of the trail.
The Chief hike in Squamish: The first chains at Peak two
The Chief hike in Squamish: The worst part of the entire trail!
Soon you’ll see the chains shoot upwards over some big boulders. It requires some manoeuvring to get up and it’s harder than it probably looks in the photo! We saw quite a few people struggle at this point, but everyone got past it. Then the chains help you through a narrow gully before leading to a ladder.
At the top of the ladder is another chain to help you on your way before it disappears and you have to rely on your feet on the steep rock to get to the summit.
The views from here are exceptional and worth the effort. You can see the first peak as well as the inlet, it made for a beautiful spot to get our breath back.
The Chief hike in Squamish: The summit of Peak 2
From here you can turn back the way you came and brave the chains in reverse, or head onto the third peak or take a different route back.
We started heading for peak three which is a much easier route than either peaks one or two but before long realised we were sadly losing the light so had to head back down the alternate route.
To get to peak three or the alternate route down you do not start descending towards the chains but continue further along the peak until you pick up the pink ribbons tied to the trees, these will lead you to peak three. If you want to descend then as soon as you hit a route which offers you the option of going up or downhill take the downhill and you’ll eventually end up back at the car park.

The Chief hike in Squamish: The pink ribbons which guide the way
Read next: The best Revelstoke hikes you must do
Heading back
Distance: 2.9km from peak two
Elevation: negligible
Heading back on the path between second and third peak meant we avoided the chains, but it didn’t save us from the roughest path on the Chief hike.

The Chief hike in Squamish: the gnarly descent
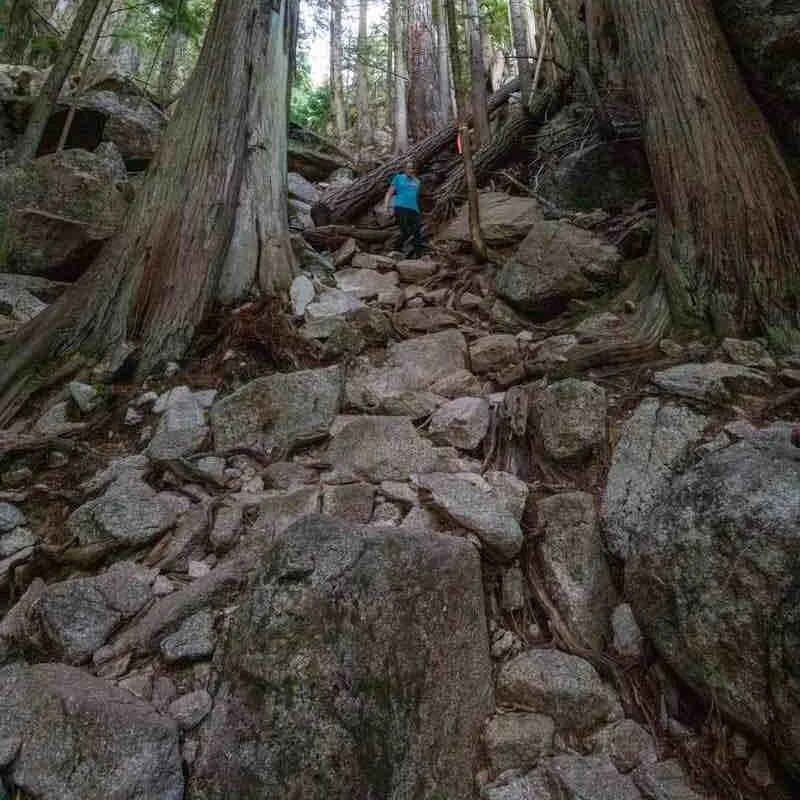
The Chief hike in Squamish: The rough path down
For virtually the entire way back, the trail involved steep drops on a path made of boulders and rocks. It really does a number on your knees, even though it is only 2.9km long! It’s slow going, but eventually you’ll arrive back at the staircase for giants and then the car park.
We didn’t really enjoy this route down and would only suggest it if you don’t want to head down via the chains.
Overall we loved the adventure of this hike and though it was definitely tough in parts, there’s a great sense of achievement in taking on the Chief.
Read next: Beautiful Tofino hikes you need to check out
The Chief hike essentials
How difficult is the Chief hike?
If you’re in good shape and you have no fear of heights or scrambling it is going to be easy for you. If you find scrambles tough it is going to be harder but probably manageable as long as you hike in dry weather.
Most of the scrambling is not done with great exposure so you won’t constantly feel like you might fall any great height. The scramble up the boulders on peak two is in our opinion the most difficult stretch of the hike which you can avoid entirely if you just head for peak one.
Whilst the elevation gain is quite intense for such a short hike it’s totally doable if you take your time even if you aren’t used to steep hikes.
How long does it take to hike the Chief?
Whilst some people go up incredibly quickly, we recommend allowing 1 hour 30 to hike to the top of Peak 1 (one-way). If you want to continue onto Peak 2 and 3, allow 4-5 hours for the total trip - this will allow you to get your breath back and enjoy the views!
Best time to take on the Chief hike
We do not recommend hiking the Chief in wet conditions, what is grippy rock in dry weather can quickly become slick and dangerous.
With regards to seasons the trail is most commonly hiked between March and November. In the winter months it can be snowy or icy and therefore potentially dangerous.
It’s a very popular trail with locals and travellers alike so if you want any kind of solitude avoid weekends and hike very early or later in the day. You still probably won’t be alone but it also shouldn’t be too crowded.
How to get to the Chief hike
The Chief hike is only a five minute drive south of the centre of Squamish along Highway 99. Make sure you park at the specific car park for the Chief and not the Shannon Falls car park unless you want to add on extra distance.
Read next: Abbott Ridge - one of the best hikes in BC
This post may contain affiliate links, meaning at no additional cost to you, that we will earn a small commission if you click through and decide to make a purchase. This helps towards the costs of running our website. :-)
Like it? Pin it!

Follow us on Social Media
Are you visiting Squamish? Would you take on the Chief hike? Let us know in the comments below!