

The Angels Landing hike is the most popular in Zion National Park and that makes it a difficult hike to plan. Since the closure of the Observation Point and Hidden Canyon trails, the Angels Landing hike has become busier than ever. And trust us, this is not a hike where you want to be at the mercy of crowds.
The trail is infamous for its dangerous narrow ridges, with 1,000 foot drops either side. I was nervous before taking on the hike and watched just about every youtube video ever made (a big mistake, they make it look way scarier than it actually is!) and I knew the one thing likely to stop me making it to the summit was crowds.
If I feel rushed in any way I start to feel pressured and that is not something you want to feel on the Angels Landing hike.
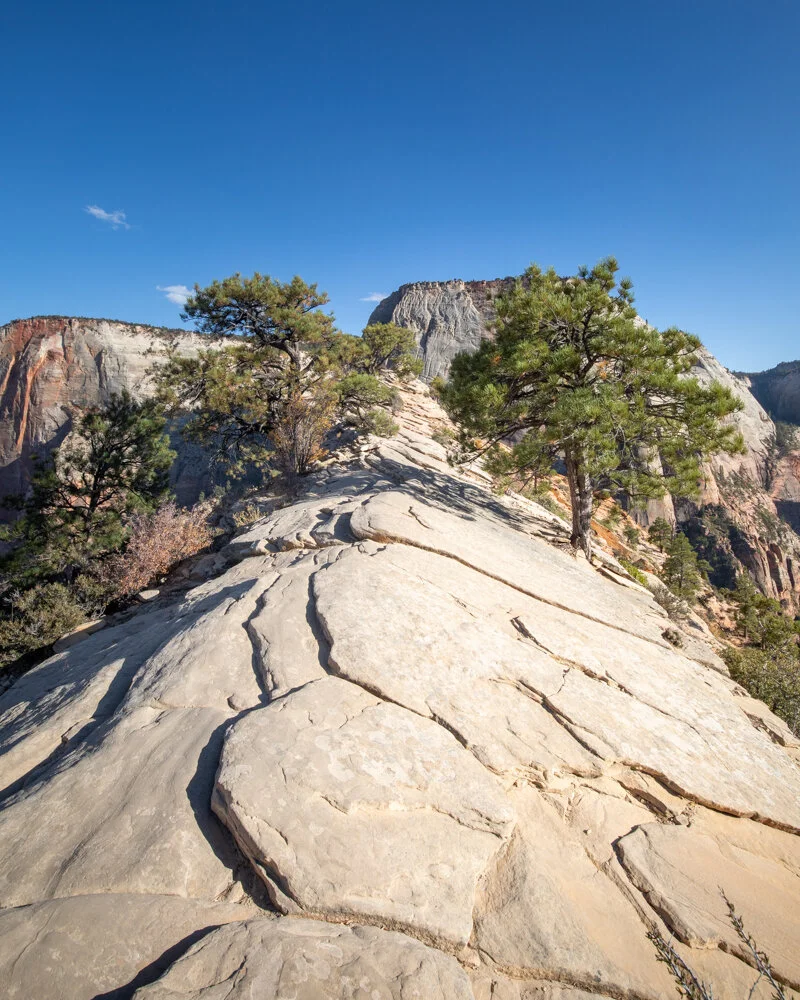
The final section of the Angels Landing Hike
However, whilst the hike isn’t exactly a stroll in the park, it isn’t too difficult if you plan correctly. The main safety issue in our opinion are the crowds. The reason the crowds make this hike dangerous is that the path can narrow to less than one metre wide and, in parts, is pretty steep with the odd scramble.
If you add hundreds of people on this trail going in both directions you have a recipe for potential disaster. However, we were able to hike this trail with hardly anyone else on it by following one hack that no one seems to have even mentioned online - and for once it doesn’t involve getting up at sunrise!
Read on to find out the one hack to beat the crowds on the Angels Landing hike.
Everything you need to know about the Angels Landing Hike
This article is pretty comprehensive, so feel free to click on the links below to jump to the section that is relevant to you:
The one hack you need to know to beat the crowds at Angels Landing
Firstly, we’re not sure if this would work at a weekend. Saturdays and Sundays are incredibly busy all year round! However, if you are visiting midweek, this trick should work perefctly.
The times everyone else visits
The worst time of day to visit Angels Landing is in the middle of the day. This is when most visitors arrive and you’ll find the trail to be pretty jam packed.
To get around this, a lot of hikers choose to arrive at sunrise. However, this doesn’t seem to escape the crowds as we’ve read about people still struggling to get on the first shuttle buses, and then seeing a lot of people on the trail. It seems that everyone has exactly the same idea!
Some people get lucky, arriving at sunrise to find just a few others on the trail, then hit all the crowds on the way back down the chains. Hearing that is what led us to trying another idea, with the backup that if it was too busy we would head back into the park the following day at sunrise. Luckily we didn’t need to.
Read next: Angels Landing in the winter - one of the most dangerous hikes in the United States’ in the snow
The time virtually no one hikes Angels Landing
What virtually no one tries, is going late! We visited in October and turned up at 3.30pm to find hardly anyone on the trail! Whether it is because everyone went early, people were worried about missing the last shuttle or simply it would interfere with dinner, we came to realise that the late afternoon was the best time to tackle the Angels Landing hike.
The best thing about turning up at this time is that you can wait a while at Scout Lookout if needs be. From here you can see the start of the chained section and chill if there are a few stragglers coming down. Only a handful of people were arriving at a similar time as us to start the trail, meaning no crowds and many long sections of the Angels Landing hike were completely clear.
I was thrilled! It made all the difference and, despite being super nervous beforehand, I made it to the top and back feeling safe and happy and putting this hike firmly on my favourite trails in Utah list.
So knowing the best time to go, here’s what to expect from the hike itself.
Read next: The best hikes in Zion National Park and Why we loved Zion in winter
What to expect from the Angels Landing hike
What is the Angels Landing hike?
Named by Frederick Vining Fisher in 1916 who pronounced that this hike was so high up that only Angels could land here, the Angels Landing trail has been attracting visitors for decades. The majority of the hike is relatively easy - there’s incline, but it’s not horribly steep and there are flat sections to rest.
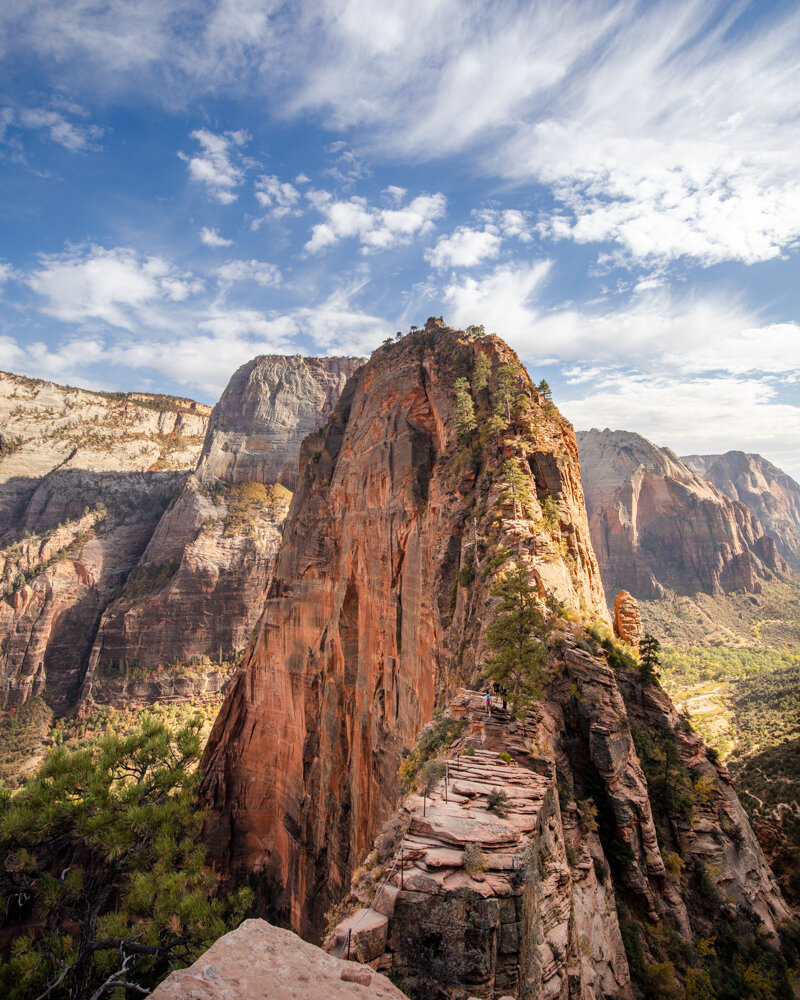
The bit that gets everyone talking is the spine with the chains. The spine of Angels Landing is only 0.5 miles long and takes anywhere between 20-60 minutes to complete (depending on crowds and how confident you are with heights and exposure).
Angels Landing Hike: The view into the canyon from Scout Lookout
Angels Landing difficulty
If you’re reading this blog then you probably want to know just how difficult - or dangerous - the hike is. Well, we took on the Angels Landing hike (taking a lot of photos and video in precarious places) to show you what it’s like from the perspective of a couple who turned back at the Half Dome Cables and the ropes on Mount Storm King. We are not fans of hikes that feel genuinely dangerous.
We were as surprised as anyone to find that Angels Landing (in the right conditions) is actually not that scary. It looks more intimidating than it is, and we’ll go into full details in our personal trail experience below.
This is not a hike for people who are really afraid of heights as you will see pretty big drops along the trail. Though the majority of it is on a wide enough track with chains to hold onto and rock with good grip. There are also parts without exposure along the chained section so it’s not that you are walking right beside a huge drop off for the entire time.
Trust us, we would tell you if this was a horrifying hike!
The conditions that make it more difficult
On a crowded day the trail would be pretty horrendous in our opinion as you would have to try to move round people continuously, meaning that one of you has to let go of the chains on a narrow section.
Furthermore, even on our very quiet day we met a few really impatient people who decided to shove past us on some narrow sections. However, this was only two out of 30ish people we saw in both directions (with almost all being headed back down). Generally speaking, people are really caring and considerate.
The issue with crowds is that your chance of meeting the impatient people are multiplied.

Angels Landing Hike: One of the early sections of the trail

Angels Landing Hike: One of the more precarious sections
However, if you follow our hack you will have time and space to take on the hike. The most dangerous parts are the sections where the trail gets incredibly narrow (primarily at the start of the chained section which you can see in its entirety from Scout Lookout and therefore pick your time to begin ascending when it is clear), but otherwise it is mostly straight forward.
We would also strongly advise against hiking this trail in bad weather: rain, strong winds, snow, ice or lightning. We saw people hike this trail in a foot of snow and then come back traumatised afterwards.
Read next: The best of Moab, Canyonlands, Arches, Dead Horse and the Fiery Furnace
Our experience on the Angels Landing hike
Angels Landing hike stats
Distance: 5.5 miles (8.9km)
Elevation: 1500 ft (456m)
Difficulty: Moderate without crowds, hard with crowds
Type of trail: out and back
Despite being classified as one of the most dangerous trails in the United States, the Angels Landing hike is one of those trails that still draws in visitors by the thousand, it’s on almost everyone’s Zion itinerary. It’s a place befitting of its grand name - a narrow ridge that climbs up to a summit with staggering views.
You can actually look down on the full spine from Observation Point and it doesn’t even look doable! Luckily it is much more accessible than it looks.
Here’s our take on what to expect from the Angel’s Landing hike.

Angels Landing Hike: Elation at reaching the summit
The hike to the start of Angels Landing
The Angels Landing hike starts at the Grotto shuttle stop and you’ll follow a straight forward trail to Scout Lookout.
This section of the hike in itself is pretty stunning as you follow switchbacks that have been cut into the rock, presenting incredible views of Zion Canyon which get better with every step.
Angels Landing Hike: The start of the trail to the landing
It is uphill most of the way, but it isn’t too long or steep for the most part, and we found that once you get into a rhythm, you can move up it quite quickly. After some flat walking you head up the first set of switchbacks which are wide and not particularly steep - this section of the trail is paved.
You’ll then get a short flat section in Refrigerator Canyon (which is another beautiful spot) and offers full shade if you’re hiking in the heat (which is another reason why we recommend going late, because it’s cooler).
You’ll then take on the famous Walter’s Wiggles: a series of 21 short but steep switchbacks! At the end of this you’ll reach Scout Lookout.
If you’re speedy, this section can be as quick as 30-40 minutes, but we recommend allowing an hour to take in the views and not exhaust yourself!

Angels Landing hike: Refrigerator Canyon
Read next: Should you visit Bryce Canyon in winter?
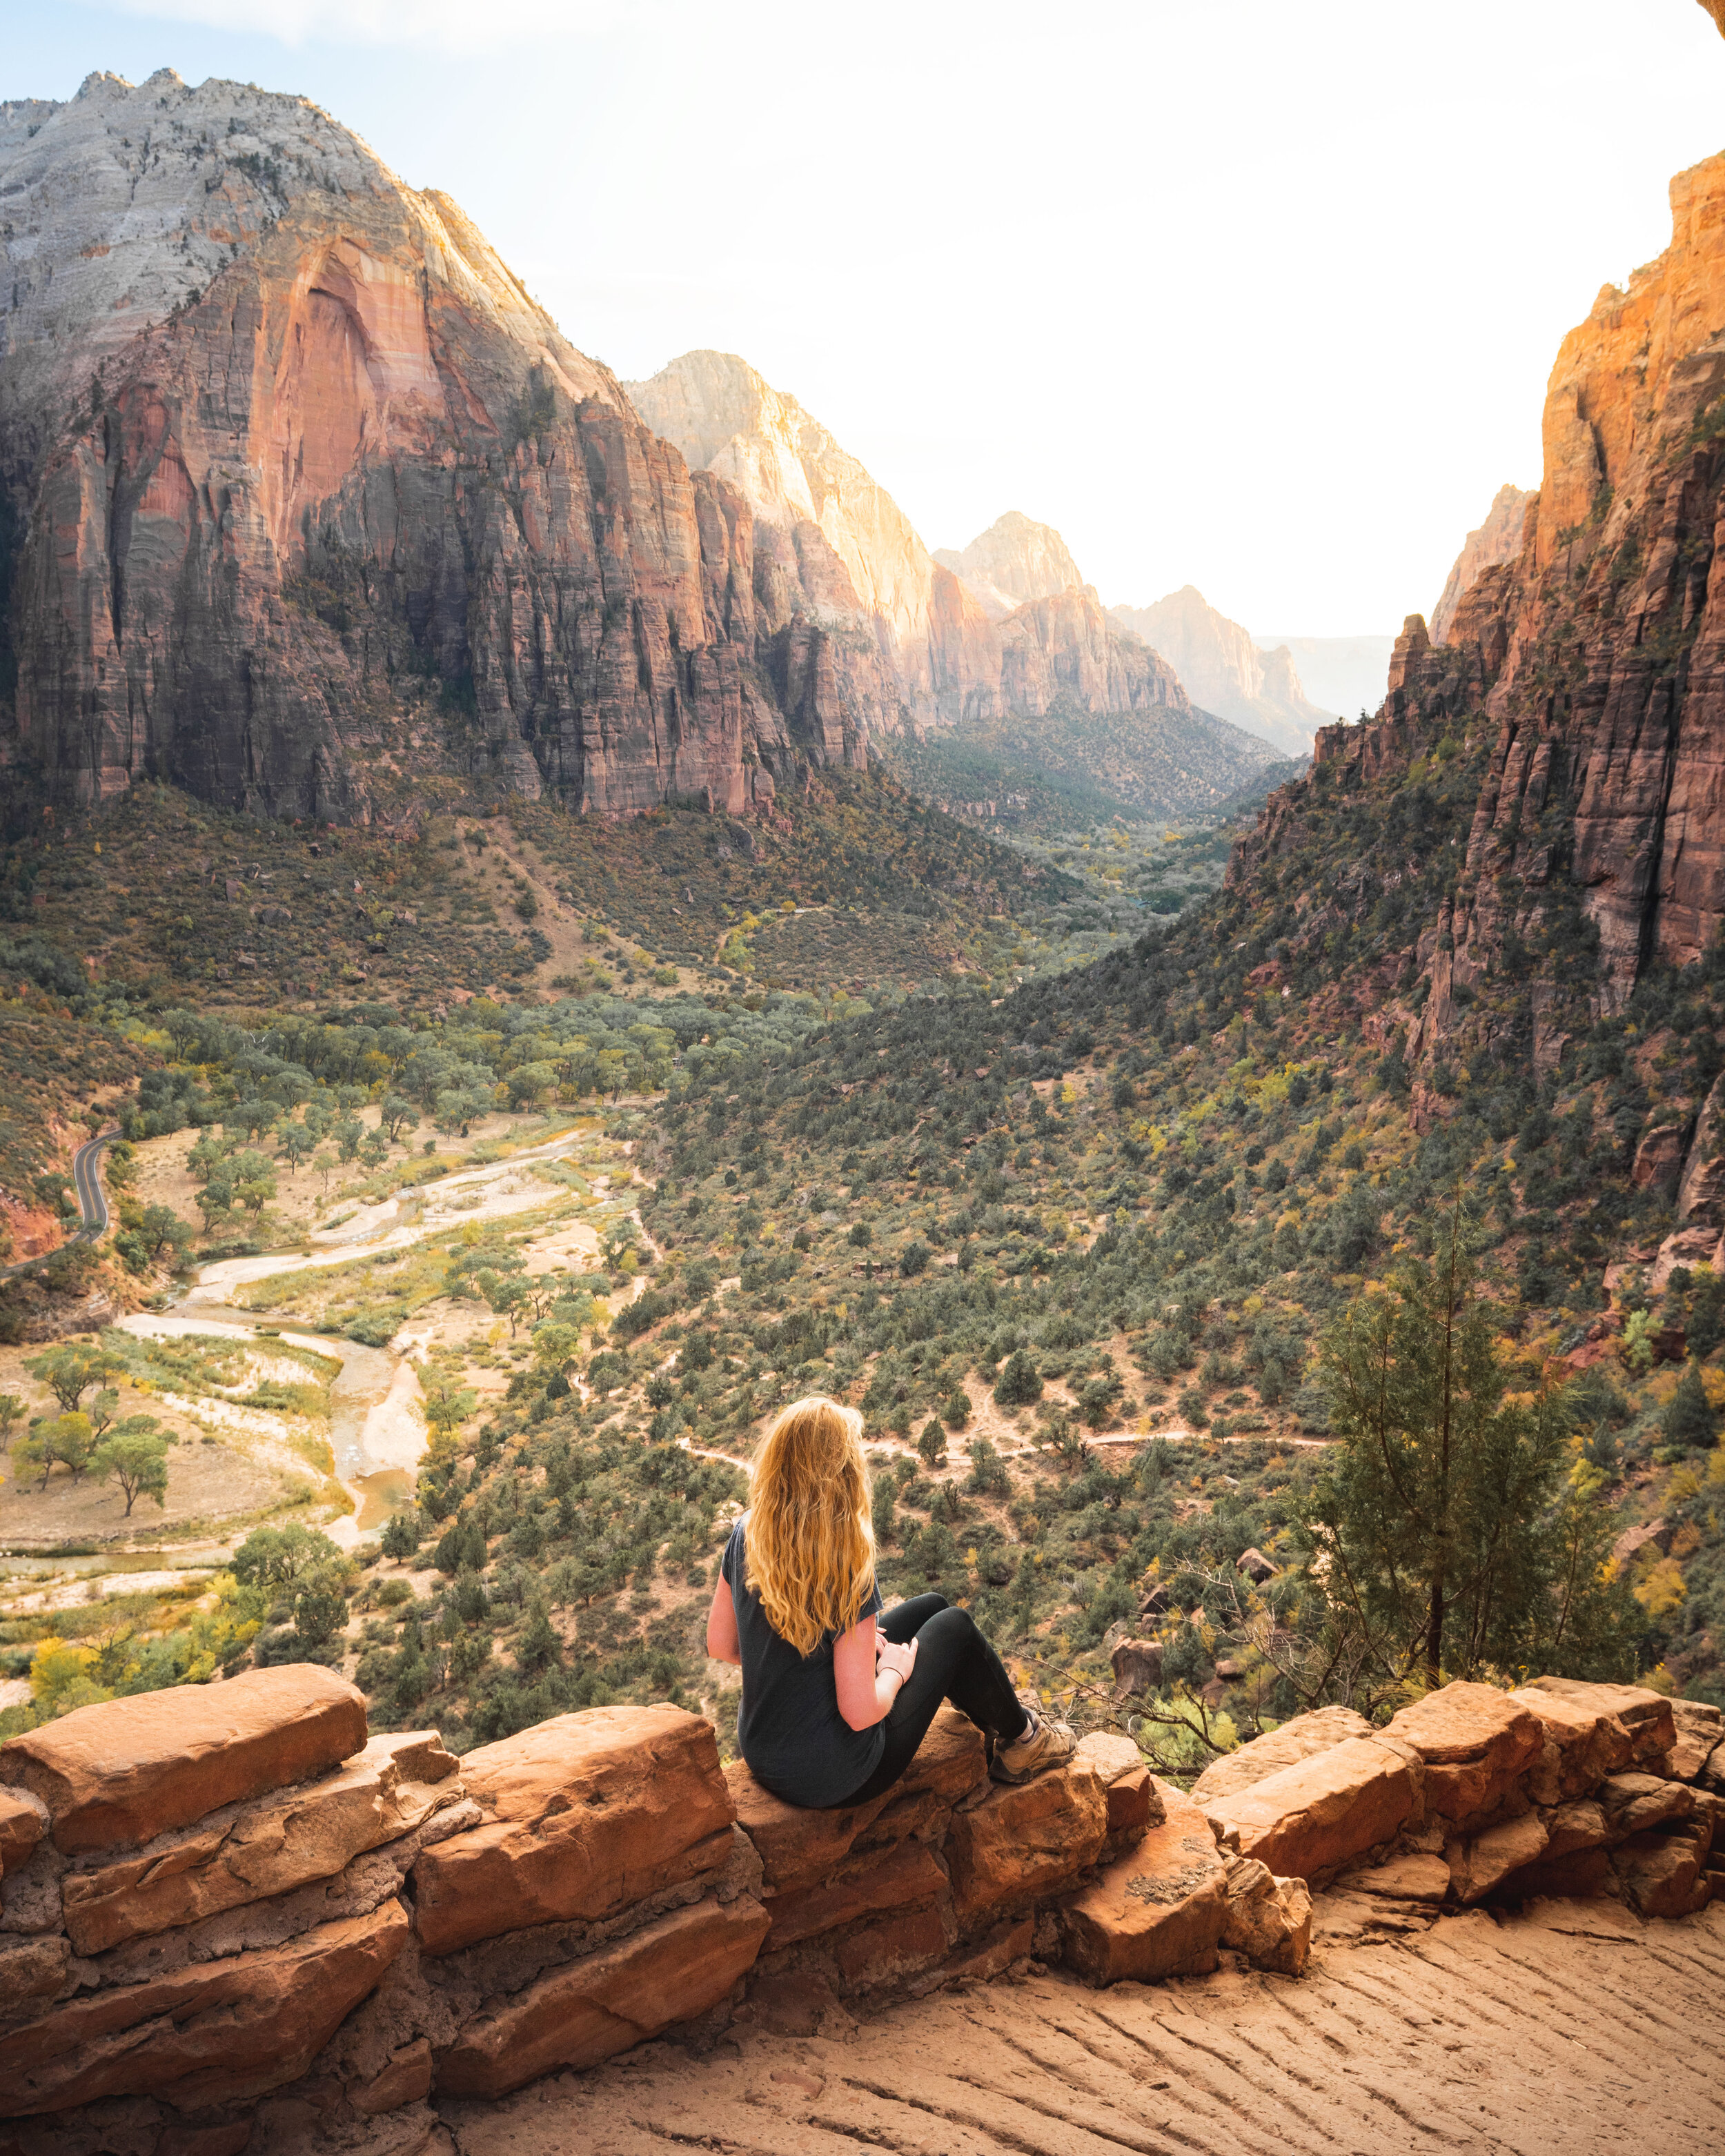
Scout Lookout
Scout Lookout is a gorgeous spot. It’s a huge space with plenty of room to sit and take a break and lots of photos before you take on the final section of the Angels Landing hike, the spine.
Scout Lookout is a great place to turn around if you start the chains and aren’t enjoying it. It also offers an uninterrupted view of the first section of the chains. We waited until we saw this trail completely clear of people before we began ascending.
Angels Landing Hike: The view from Scout Lookout
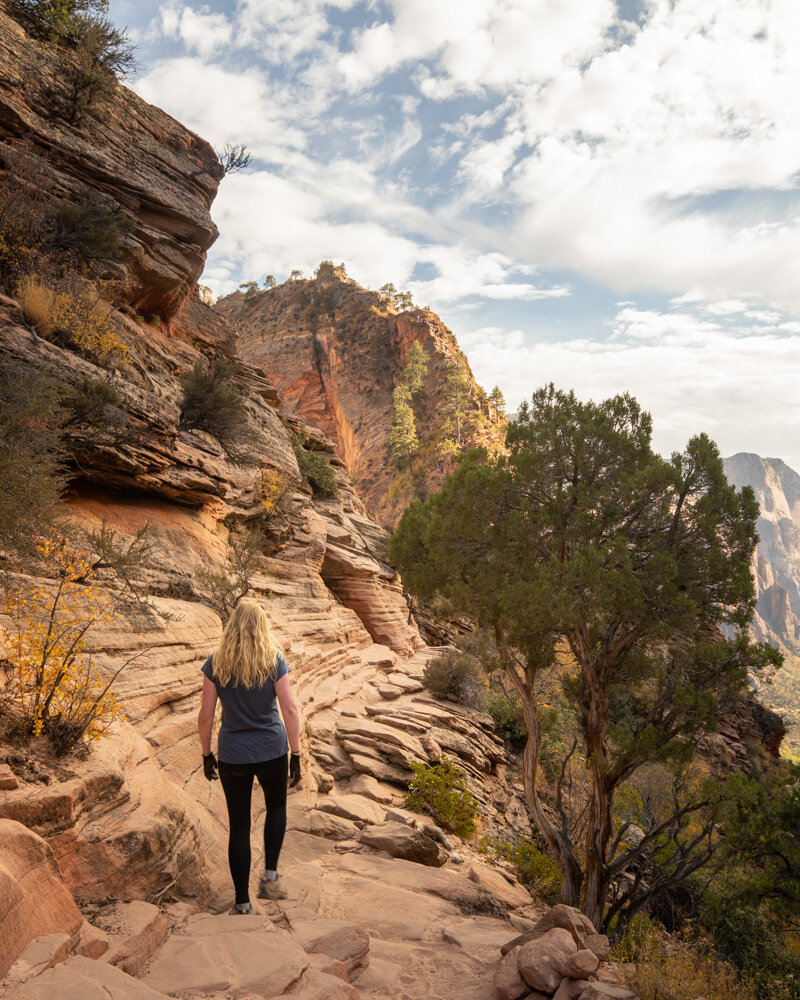
The start of Angels Landing
We’d argue the first section of Angels Landing is arguably the trickiest and most precarious. The trail goes around a steep rock - not over - and the path is narrow.

Angels Landing Hike: The starting sections

The first section of the Angels Landing hike
There are a couple of places to stop along the way, which we recommend taking advantage of. It’s easier to let people pass here and also to have a few breaks from the concentration (on the way back we didn’t find this section scary at all because we’d grown in confidence but on the way my nerves were still jangling).
There’s one short section with no chain early on and - because this was Angels Landing and I’d let all my youtubing psyche me out - it unnerved me.
However, I realised on the way back it was actually no different to any other hike I’ve done that involved a little easy scrambling and it was just the fact I was expecting danger that it got to me.
Angels Landing Hike - One of the sections with no chains
I skipped down it on the way back and my advice would be try not to get psyched out ahead of time and treat it like any other hike that has some exposure.
There is one section before you come to a wide flat lookout area where the the trail is at its narrowest and the path becomes less than half a metre wide. There are chains, but it’s certainly not a place you want to cross people which luckily for us we didn’t have to worry about!
It isn’t long before you come to an area where on your right there is a huge amount of space to sit off the main trail and have a break and admire the views.
Don’t do what I did which is to look up at the spine stretching ahead of you and start doubting yourself. For me, this was the most intimidating sight on the whole trail and it came after what I now know to be the hardest section of the chains.
At the time, doubt went through my mind and I even said to Joe ‘I can’t believe how far I have to go still, I won’t make it’. Luckily I ignored my instincts and pressed on and it really isn’t as bad or as long as it looks!
Read next: How to spend 1 epic day in Capitol Reef National Park
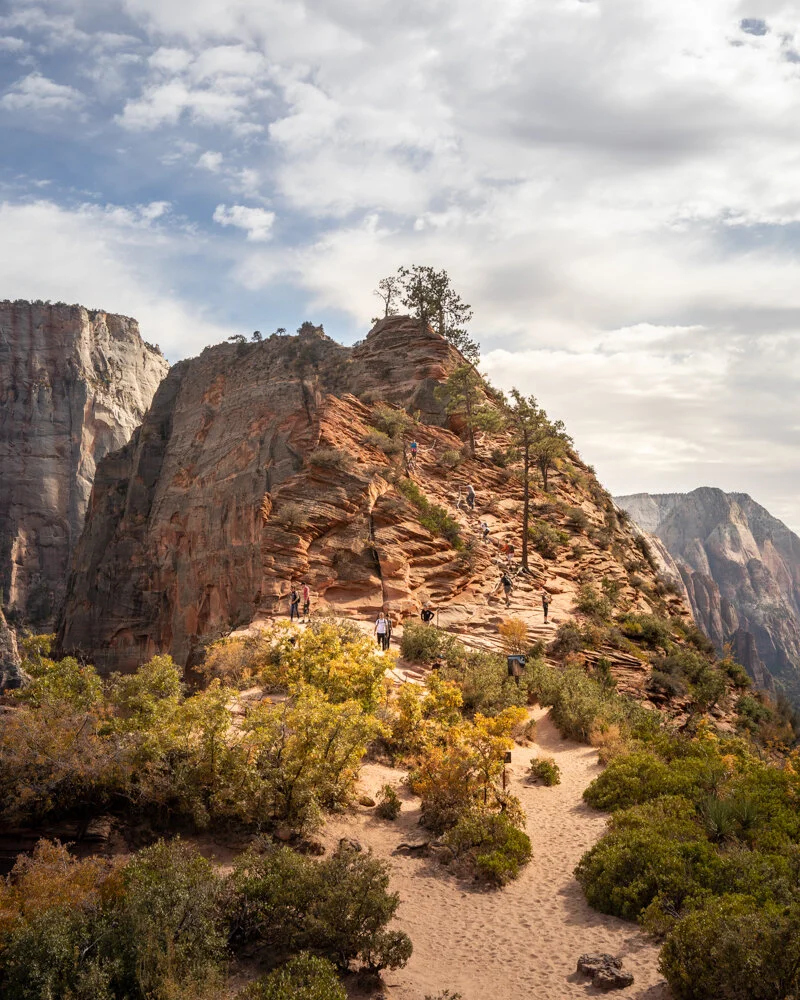
The second part of Angels Landing
Whilst the trail looks steep and narrow, it is deceiving. The vast majority of the track is fairly wide and not as close to the edge as the section you have already walked.
From the lookout you’ll head briefly downhill and have to cross a large drop with no chains (a place that can bottleneck with queues at busy times). Having said that, it is fairly wide and very grippy and - if it really worries you - then you can go on all fours. This was my plan until I realised it was grippy enough that I could walk it ok (albeit I was glad to reach the next chain just for the feeling of security).
After that it’s uphill all the way!

Angels Landing Hike: The start of the final climb
Read next: The only trail that is still open to Observation Point
The trail is a tiny bit fiddly in parts as there are some sections which are steep and require scrambling. Luckily these sections are generally away from the edge and this actually made me feel safer than the easier chained sections which were next to a drop.
There are generally chains to grab onto when the path gets exposed, or whenever the trail gets near the edge. You’ll also find chains when there’s a little scramble, where a chain may help you get up the trail.
Thankfully, the majority of the rock hasn’t been worn down and has retained really good grip, despite the huge numbers of people taking on this trail. This was a marked difference to our experience at the cables on the Half Dome hike where the trail is worn completely smooth, making it extremely slippery.

Angels Landing Hike: The chains on the second section

Angels Landing Hike: One of the scrambles on the section section
Without the crowds you can take this section as slow as you like, working out foot placements and what feels safest to you. I loved the freedom to just take my time without worrying that I was holding up a queue of people.
After approximately 15 minutes at a leisurely pace you’ll reach the minor landing - another large flat area with a stunning view. The hardest of the uphill section is done now and you’re only 5-10 minutes from the very top.
Getting to the summit from here is pretty simple: there are even a few bits with proper steps cut into the rock (such a luxury!). Like a lot of this trail, the photos make this section look a lot worse than it actually is.

Angels Landing Hike: the final section
Angels Landing hike: showing how angles can be deceptive!
Getting across to the end of the trail was a bit of a surprise as it’s fairly flat, but some of the rock is slanted and it is quite exposed (though wide).
Luckily, we had very little wind but we think it would be scary in strong winds. But once you’ve traversed this you’ve made it to the very summit of the Angels Landing hike.
The flat, but slanted section to the summit of Angels Landing
The view is magnificent and hopefully you’re up there with very few others. We had just five other people on top with us and the summit is actually really big. For the most part of the hike to the top it felt like we were the only ones on the trail, apart from the ubiquitous squirrels and chipmunks - don’t let them get anywhere near your bags!!
Descending on the Angels Landing hike
Having seen how many steep sections there were, we were pretty concerned about the journey downhill. It’s fair to say that I was more nervous about getting down as I always find descents more precarious.
Luckily, as we had timed it perfectly, we were able to go all the way down without having to pass others. This gave us time to do the scrambles without people waiting.
Getting down in these conditions was actually quite straightforward as the rock had really good grip and we weren’t worried about slipping. This meant we could trust our feet and move at a decent speed.
There were sections which required some attention, but nothing compared to what we’d read online! We were surprised to find out that we were quicker on the way down than the way up and didn’t feel nervous once.
If you are nervy about the climb down, we recommend bringing some gloves. You can buy gloves with great grip from Home Depot for as little as $3, we used these and though we wouldn’t say you need them, they were nice to have. This will give you extra confidence with grip on the chains and make the hike easier.
We descended the spine in half an hour and that included taking photos and video and we were thrilled to make it back to Scout Lookout knowing that we had plenty of time to make it back before the shuttle stopped running.
Read next: The stunning slot canyons of Grand Staircase Escalante
Essential info about Angels Landing
How long does the Angels Landing hike take?
We recommend allowing at least 3 - 4 hours to do the Angels Landing hike (and possibly more if you don’t regularly hike up steep trails).
Is Angels Landing dangerous?
There’s no denying that people have died on the Angels Landing hike. However, this is a very, very small percentage of the overall hikers who do this trail every year. We believe that this hike isn’t dangerous as long as you are careful, don’t rush and are aware of the steep drops and other people.
The crowds can make this hike quite dangerous, and an entirely different beast to the trail as we hiked it without crowds.
How to avoid the danger
The primary dangers on the trail are the huge drops which are most dangerous when the path is crowded. Be patient and considerate of others on this trail. Downhill hikers have priority, so make way for them when you are climbing up. However, don’t be forceful with this system as confident hikers should give room and time to those who aren’t, in either direction.
This is also a hike you should avoid if there is rain, it is windy or any conditions other than dry and still. We saw people do this whole hike in the snow and it was utter madness (we know because we tried before turning back!). Even those who completed it returned with their nerves in tatters and regretted it. With any of these conditions, the Angels Landing hike is incredibly dangerous.
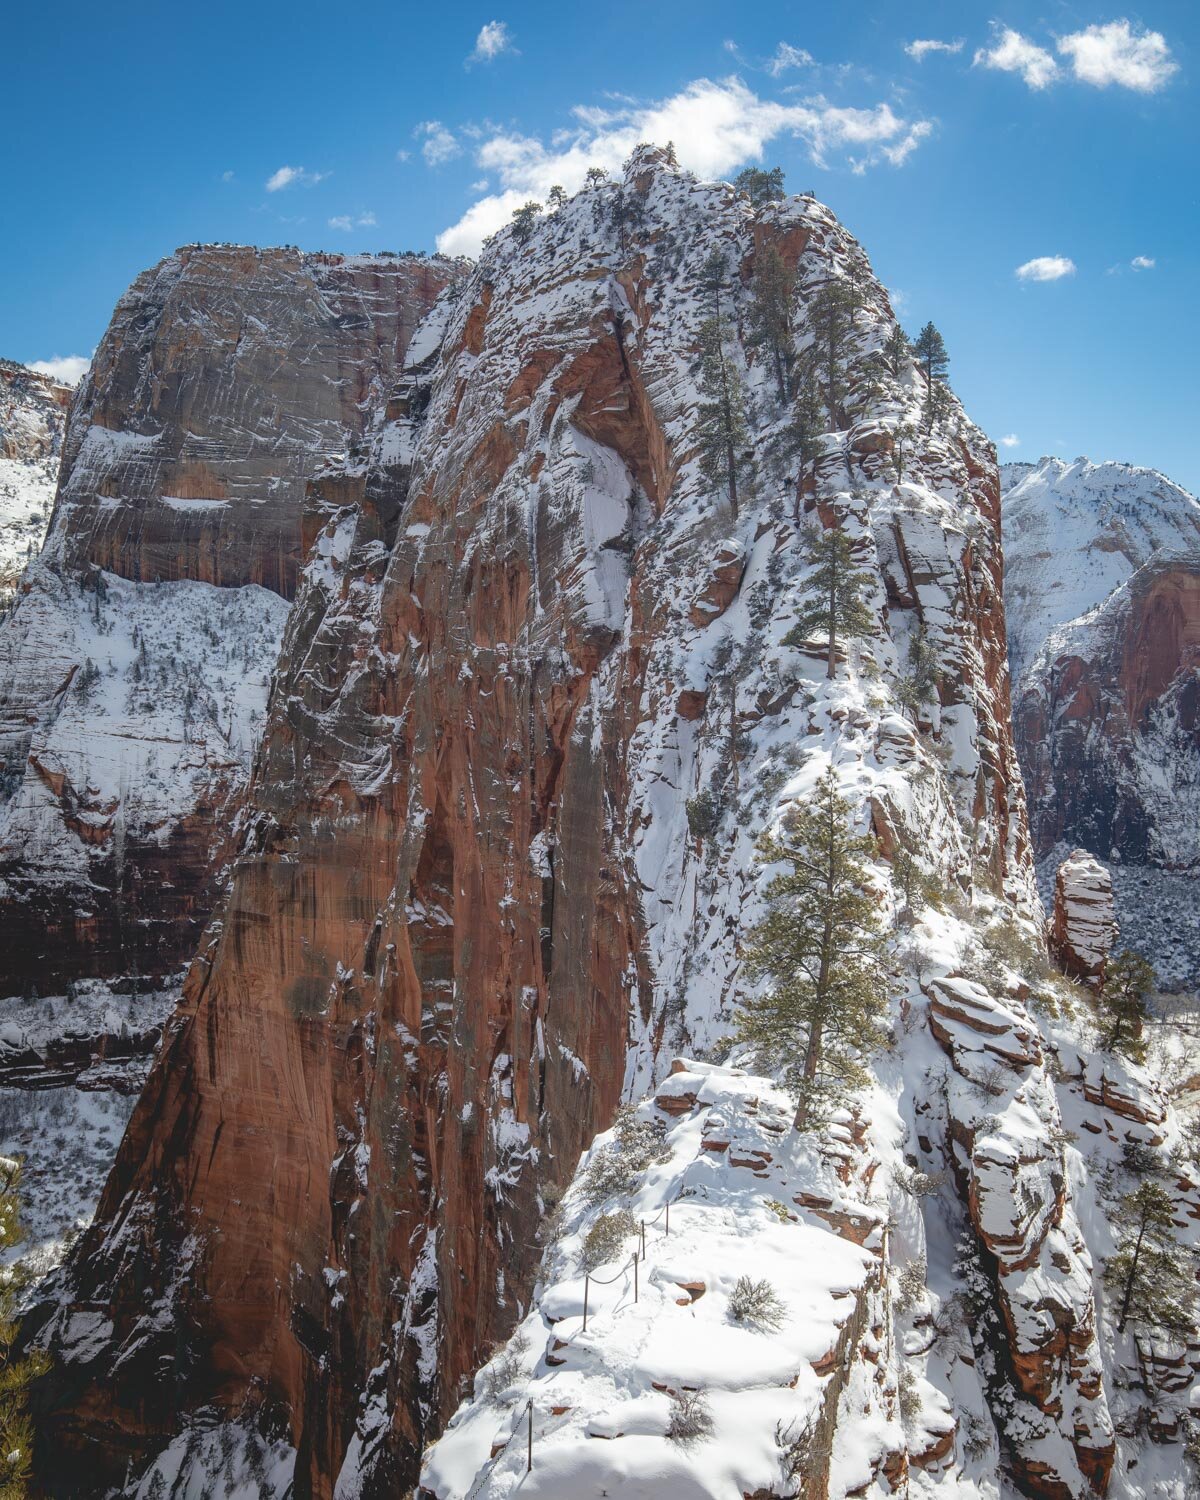
The Angels Landing hike in the snow
Overall we didn’t feel in any danger on this hike but we had perfect conditions - lack of crowds, no rain, little wind and cool temperatures.
Having said all of this tragic accidents have happened, even to experienced hikers. One slip could be fatal so we would never declare this hike to be entirely safe. It’s important, especially if you are nervous, to try and mitigate as many risks as possible by only hiking in good conditions.
Do you need to be fit to take on the Angels Landing hike?
You don’t need to be particularly fit to take on this hike because you can take your time, but it does help. If you feel confident in your ability to climb the steep sections of trail with ease this will go a long way to feeling more comfortable and also to have the energy to be highly aware of foot placement etc.
If you aren’t confident and are already tired at Scout Lookout, we don’t recommend taking on the final part of the hike. This is not the place to test yourself and you might also put other people in danger.
The shuttle bus dilemma
Between March and November, Zion runs a shuttle bus system everyday, which means you cannot park at any of the trails inside the canyon. These shuttle buses run during the weekends in the latter part of February too.
This makes the Angels Landing hike problematic as you can’t make a really early start unless you are prepared to walk an extra six miles miles from the visitor centre or cycle to the trailhead. We’ve also heard that even the first shuttle buses at sunrise can be packed (particularly on the descent from the spine when many other hikers are now walking up). Essentially you can’t entirely avoid the crowds during these months.
If you don’t want to cycle or walk, your other option for avoiding the first shuttle bus and therefore having virtually no one on the hike with you is to stay at Zion Lodge. You can easily walk from Zion Lodge to the trailhead and beat the crowds.
The lodge is very popular though, so book as early as you can if you want to take this option. If we had a lodge reservation we would have walked the section of the trail to Scout Lookout in the dark and then waited for first light to hike the spine.
Best time to do the Angels Landing hike
Public holidays, school holidays, weekends and summer holidays are incredibly busy in Zion and are the worst time to take on the Angels Landing hike.
If you have a choice, go for mid-week during the spring or fall (or winter if snow and ice are not present). The temperatures aren’t too high and the crowds are relatively low. Summer is hot and crowded, and the winter can be icy and incredibly dangerous - although winter is a wonderful time to visit Zion for other hikes, or if ice is not present on Angels Landing.
As we said earlier, we believe that the afternoon is the best time to start this hike. Otherwise go for sunrise. You may see people on the way down, but the way up will probably be clear.
What to bring
A pair of gloves with grip can help on this hike. Bring a hat if it’s hot as almost all the trail is fully exposed, plenty of water and some snacks.
The one thing you won’t need are hiking poles. The trail is almost entirely rock, meaning you can’t plant them in the ground to help.
Zion National Park entrance fee
You can use the America the Beautiful Annual National Parks Pass to get into Zion (US80 per annum), otherwise it will cost $35 for entry with a car for 7 days, $30 for a motorbike or $20 per person on foot or by bicycle.
As the National Parks Pass is $80 for the year, if you plan on visiting at least three parks in a year it is well worth it.
Packing suggestions for Angels Landing
Having the right gear can make a huge difference, especially for Angels Landing. Here’s what we pack and have relied upon for years:
Gloves for the chains: Something that makes it a lot easier to grip those chains- Check on REI or Amazon
Day Pack: Osprey Talon 22 (we’ve owned this for years). Check on Amazon, REI or direct with Osprey
Hiking Boots: Merrell Moab (for men and women). Having good boots will give you better grip and more confidence. We’ve both used these for over three years and they just keep going. Check them out on REI or Amazon
Reusable water bottle: To avoid single-use plastic. Check then out on REI or Amazon
Where to stay in Zion
Cable Mountain Lodge
When it comes to staying in Zion, the majority of accommodation is concentrated in the nearby village of Springdale. We stayed at Cable Mountain Lodge and absolutely loved it.
The lodge is literally steps away from the entrance to the park and the Visitor Centre, meaning you won’t lose any time driving to and from the park!
Check the latest prices on:
This post may contain affiliate links, meaning at no additional cost to you, that we will earn a small commission if you click through and decide to make a purchase. This helps towards the costs of running our website. :-)
Like it? Pin it!


Follow us on social media
Are you planning a trip to Zion? Would you take on the Angels Landing hike? Let us know in the comments below!


