

The Narrows is one of the USA’s most iconic hikes and is a highlight of a trip to the majestic Zion National Park (our favourite in the States). It’s also one of the most unusual hikes you can do as the vast majority of the trail is through a river!
Yes, not by a river, IN a river.
We’ve done a couple of trails like this before such as Wadi Mujib in Jordan and Wadi Arugot in Israel, but the Narrows are on a completely different scale - it’s a loooong walk. The day hike is 5 miles each way, with the full top down route being a 16 mile overnighter.
Here’s everything you need to know to take on the Narrows hike.
The Narrows hike - what to expect
The Narrows
To make things easier to navigate, we’ve created an index below. Click on any of the links to skip to the sections you want to read.
What to expect
Give yourself plenty of time for the Narrows as this is a really slow walk! We averaged 1.5 mph and we are usually pretty speedy hikers!
If you plan on doing the whole hike, start very early in the morning. Having done a couple of wet canyon hikes before we were expecting to find it easier than we did.
There are quite a few factors which can impact how difficult the hike is on any given day (such as height of the water and how fast it’s flowing) but we’d say, expect it to be fairly slow going and then if you have great conditions you’ll be faster and pleasantly surprised.
The river & conditions
It’s really hard to predict what conditions you’ll get in the Narrows. We were told in fall the water level is usually at its lowest, yet for us it was up to our chest and higher in some sections.
The great thing about doing it as a day hike though is that if it is harder than you were expecting you can turn back at any time, the water gets deeper as you go along so you can always choose to experience the shallower water at the beginning and then head back (this is what most people choose to do).
You are walking through the water for the majority of the hike and mostly over rocks and large pebbles. This can be slippery and combined with the fast flowing water can make walking tricky.

The start of the Narrows
Read more: Zion in winter, what to expect and the Angels Landing hike in winter
What to wear
If you’re planning to go quite far into the Narrows we’d recommend hiring the special boots from one of the outfitters in Springdale (just outside the park entrance). We found with the boots it was still slippery in parts but we definitely had better grip. You can hire them for $25 per day.
The hire company will also give you a walking pole for balance (which is actually really useful) and a few tips about the hike. You can hire waterproof pants and a top but as mentioned we didn’t rate the trousers that highly, especially for the cost!
Most companies offer a 50% discount if you hire for more than one day which is handy if you want to hike Kanarra Falls and the weather is cold (it’s not strictly necessary for Kanarra but nice to have).
You can pick up the gear the day before after 3 or 4pm depending on which company you hire from. We’d recommend this as the queues are huge in the morning and it will mean you will definitely miss the first shuttles.
Even in summer the water will be cold. In fall and winter it will be ice cold. We had neoprene socks with our boot hire and still felt cold! If you’re not intending to buy the boots you could grab a pair of neoprene socks cheaply online so that your feet don’t get frozen.
Read next: The best hikes in Zion and a comprehensive guide to Angels Landing
Versions of the hike
Again if you’re only going a short way it’s no big deal, but if you plan on hiking most of the route you can expect to be in the water for 8-10 hours.
If you’re doing the day hike the trail starts at the Temple of Sinawava and is completely dry for the first mile. It undulates a little, but it’s really easy.
Then before you know it you reach a set of steps straight into the river and that’s where the fun begins!
Read next: The best of Moab, Arches, Canyonlands and Dead Horse Point
The Narrows hike
Jumping into the Virgin River
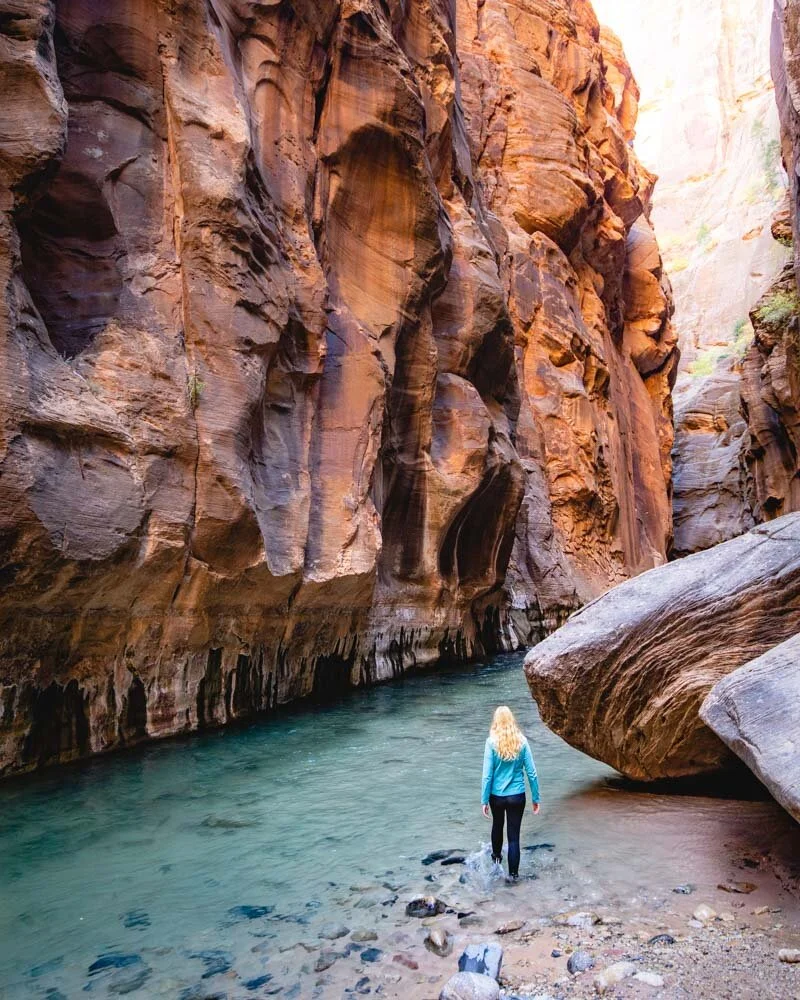
This first section is the easiest part and is a good way to get your Narrows legs. You’ll realise that the river is almost entirely made up of smooth stones, which doesn’t make for stable footing. It will slow you down, but you’ll get more confident as you go along.
The first couple of miles are relatively shallow, and we found ourselves tacking from bank to bank, zig-zagging the river to avoid the deepest sections.
The first couple of miles is the widest part of the river and - whilst beautiful - is not as picturesque as Wall Street or beyond .

The wider sections of the Narrows hike

The Narrows Hike: going into the canyon
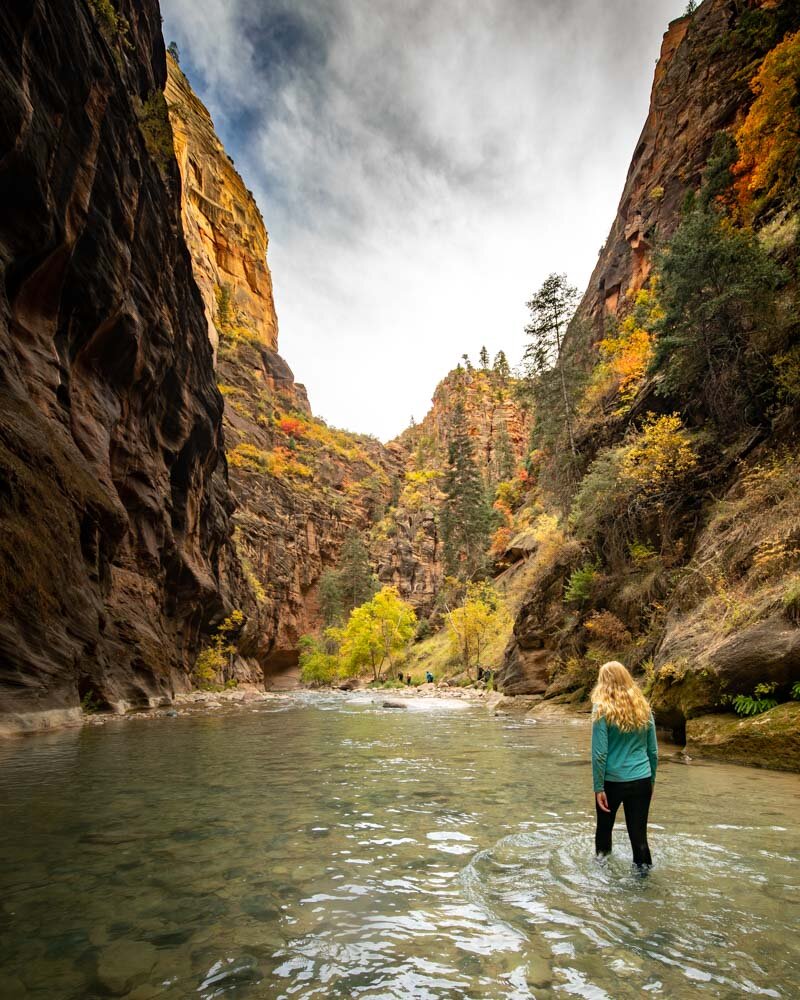
We visited during the fall, and the trees had already begun to change colour, with lots of yellow adding more magic to the scene. However, it was also incredibly cold. Even with several layers, it was so hard to keep warm!
The canyon doesn’t see any light until the middle of the day, and even then it doesn’t really warm up. We had thought the water felt cold in the first two miles but realised on the way back when it felt positively tropical compared to the water in Wall Street and beyond!
If you get tired, there are lots of rocky banks along the river that you can rest on. The water changes colour in certain sections from a darker green to an almost turquoise blue. It’s extremely pretty but nothing to what’s to come if you make it to Wall Street.
The canyon gets narrower and narrower as you progress before reaching the start of Wall Street and the junction for a worthwhile side trail.

The Narrows hike: getting towards Wall Street

Heading towards the junction for Orderville Canyon
The side trail to Ordervile Canyon
The hike through Orderville Canyon is fairly short and well worth taking. It takes you through a very narrow section of canyon and was blissfully quiet on our visit.
It’s largely flat and rocky before you step up a small waterfall (it’s not difficult) and then meander upstream for a few hundred metres before you have to start scrambling.

The start of the trail to Orderville Canyon
Some people chose to turn back here, but you can climb up the log and go a little further. Eventually you’ll reach a small waterfall which is the end of the side trail.
Simply head back and continue on your journey through Wall Street! If you don’t want to do the scramble, it’s still worth wandering through the canyon on the easy path for as long as you feel comfortable.

The small waterfall at Orderville Canyon

The trail up Orderville Canyon
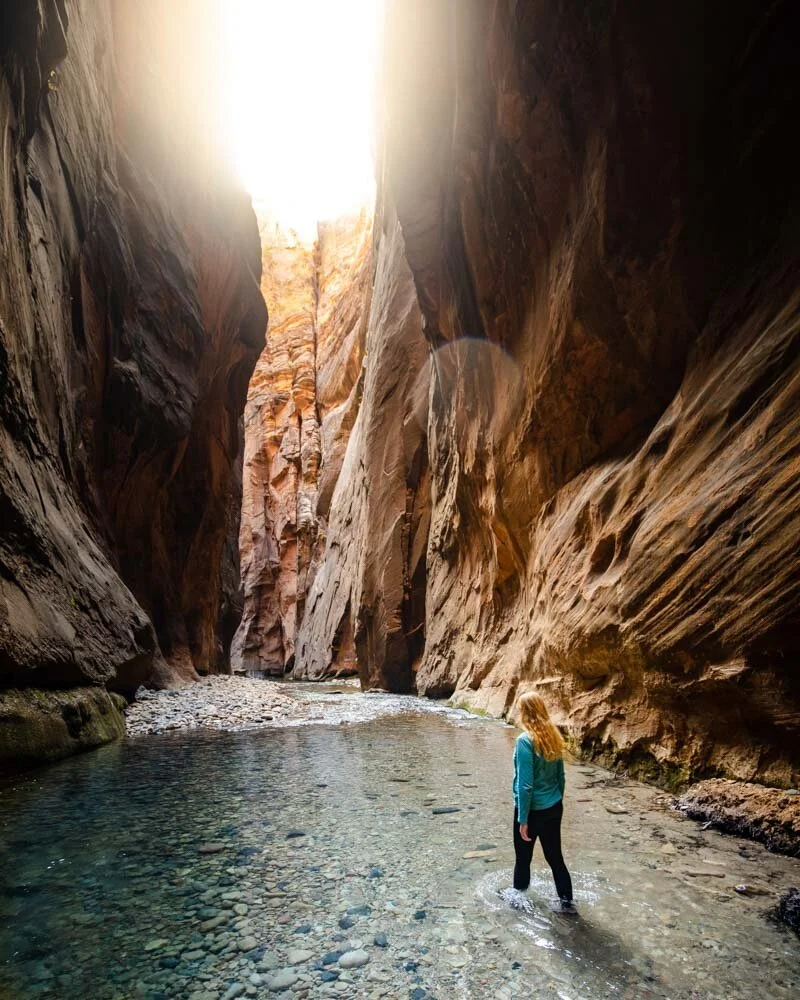
Wall Street
Once you’re back, you’re in the main section of Wall Street. This is a narrowest section of the Narrows hike and we found it to be a lot quieter than the earlier part of the trail.
For some reason the majority of people chose to hike back before the most beautiful part of the Narrows! It’s a dramatic section of trail and the point at which you really feel like you’re in a slot canyon.
For us this is by far the most special part of the hike and the reason to keep going in the freezing cold water! You can walk for about a mile through Wall Street and we were in awe of how special it was.

Read next: A complete guide to the only Obsevation Point Trail that is still open
The downside of Wall Street is the narrowing of the walls meant the flow of the river gets stronger and created a lot of deeper sections. At this point most of the dry land disappeared and there were fewer places to take a break (well, barely any at all).
There are a couple of sections where you can hop out, but they are far less regular than earlier on in the river. The stronger current made it even slower going and I nearly went over several times. Even using the big wooden stick that came with my boots didn’t help much during this section.

We recommend watching what other people do as it is easy to find yourself in really deep water when there might have been another route. If you can, cross the river often to avoid the worst patches of fast flowing deep water.
Towards the end of Wall Street came the nasty patch.
Read next: The best hikes in Grand Staircase Escalante
The nasty patch
The hardest part of our experience on the Narrows hike was about four miles in. This section had a choice of going through ice cold water above our waists or scrambling up a horrible, steep and slippery rock slope.
We did both routes (one on the way there, the other on the way back) and neither were pleasant! We would recommend going through the water, but only because the rock scramble feels like you’ll slide down the bank at any moment.

The Narrows Hike: Cat’s face should tell you how cold the water is!
After this section we only went a little further before we admitted defeat. You could only pass the next section if you swam! It was time for us to call it a day (and most others did too).
If we did the Narrows hike again we would definitely do it in summer. I don’t mind cold water and love swimming if the air temperature isn’t freezing. I think the hike would have been much more enjoyable without the cold air and wind.
Past the point we got to (just over four miles in) you can see a waterfall but we didn’t meet any day hikers that got that far. You definitely could get there on a day hike, but no one we met wanted to swim in the ice cold conditions!

The Narrows Hike: near the point we couldn’t get beyond
Read next: Should you visit Bryce Canyon in winter
Heading back
In a lot of ways, heading back was harder than the walk out. As the flow is behind you now some sections got trickier. Getting your footing whilst being thrown forward was quite challenging!
However, it gets a lot easier past Wall Street, and eventually you’ll reach the wider sections where the sun comes out, the water feels warmer and the current has all but gone. We saw a lot of rock climbers rappelling downwards and hiking out which looked pretty cool if you want a different experience.

Overall we’d say the Narrows hike is amazing and is definitely one for your bucket list, but we did underestimate how the weather would affect our hike.
We planned to do this walk in fall because we heard it was the best time but unless you are comfortable with really cold temperatures we wouldn’t recommend late fall.
Having said that I met someone who had hiked the Narrows at a similar time the year before and the water had only been a max of knee height! That would have been much easier so you never can tell!
Essential info about The Narrows hike
Is the Narrows hard?
Yes. The Narrows is a hard walk as you are fighting against the flow of the river (it’s like cycling in a strong headwind). It isn’t steep at all, but it is a slow hike and over 10 miles long. However, you don’t have to do it all. You can go as far as you want and turn back.
Footing can also be difficult and it gets slippery. It will be easier if you have low water level and the current is not too strong but given most people have set dates in mind you normally don’t have the chance to choose what you will get.
When the current is too fast (150 cubic feet per second) the Narrows will be closed for safety. This occurs most often in spring (typically April/May time but has even been closed in mid July before) following snow melt and in winter.
How far is the Narrows hike?
The Narrows hike is 10 miles long (return) if you choose to do it as a day hike all the way to Big Spring, but you can extend it to 16 miles if you choose to do the top-down route which requires a permit.
While some people walk the top down route in one day it is not advised unless you are super fit. Most people choose to camp at one of the designated campsites.
How long does it take?
If you plan on doing all 10 miles, we recommend allowing 7-8 hours (yes, it is that slow a hike!). This will mean you have time to enjoy the trail and not feel rushed. If you are doing the top down route it is typically done in two days.
Best time to visit the Narrows
The best time to visit the Narrows all depends on what you are looking for. If being warm is the priority, then July and August are the months for you. If avoiding the crowds is really important, then look at late September/October and June (note that some years it may be closed in June). These will be significantly colder than the summer months, but the number of people in the Narrows will be significantly smaller.
In winter you will need to hire a full body suit so you don’t catch hypothermia. These can be hired in Springdale. It is also advised by the hire companies to rent them in fall too. I chose not to whilst Joe hired only the trousers.
Personally I think I would have been more comfortable with the suit (but they are incredibly expensive)! Joe thought the trousers made a big difference until you became fully submerged in the water at which point they couldn’t save you!
Best time of day to hike the Narrows
The morning is the best time of day to hike the Narrows if you plan on doing the whole trail. If you are only looking to do a small portion of the Narrows, then we recommend visiting in the late afternoon when it has warmed up a bit.
The big rush tends to be in the morning as the people who want to hike the furthest start early. By the afternoon, the lower sections are quieter and warmer, which makes for a more enjoyable hike.
If you’re a photographer then the best time to reach and photograph Wall Street (the narrowest and most photogenic section of canyon) is around midday.
Can children hike the Narrows?
We saw a lot of children hiking the Narrows, but you should be careful of the flow of the river and height of the water. There were several sections which came up to our chests which would be very difficult for a child to hike past!
The first section is shallow and will be the easiest for children. We also saw parents carry their children over the deepest and fastest flowing sections but that would all depend on the child and how you would feel doing that. I thought it was very brave as sometimes I had trouble not being knocked over carrying nothing at all!
Is the Narrows hike safe?
Thousands of people hike the Narrows each year with the majority having no problems.
However, we did see someone being taken out on a raft after injuring themselves. You should take it slowly and carefully as this is not a place you want to risk injury!
The main danger is flash floods. Be conscious of the weather forecast as even if it is sunny in the Zion area, severe storms up river can create flash floods. Check with the visitors centre beforehand to see what current conditions are like.
However, you should be mindful that canyons can flood at any time. Whilst the visitor centre update the sign on the Riverside trail before you reach the river it never says no risk as they simply can’t guarantee it.
An aspect that makes the Narrows hike difficult is the flow of the water. Before you go, check with the visitor centre about the current speed of the water. They will advise you whether it is safe or not. If it is flowing fast, the Narrows will be an unbearable hike.
As you spend a lot of time in the water, you are constantly fighting against the flow of the water up river at first and then down river. We found this makes it much more tiring that any other kind of hike.
The other thing to consider is that there were sections which went above our chests. This all depends on the height of the river - which changes throughout the year - but if the river is higher you may have to swim some sections.
This is rare (but was the case on our visit), but essentially assess each section and whether you are comfortable with it.
The shuttles
Unless you are one of those brave people who want to hike the Narrows in the winter, you will need to take the shuttle to the trailhead. Cars are not allowed beyond Canyon Junction when the shuttle service is in operation, so everyone has to take a shuttle. During peak season they can get very crowded with long queues (despite operating every five minutes).
In the summer it is almost impossible to park at the visitor centre unless you arrive at sunrise. If you can’t get a space in the visitor centre, then you’ll have to park in Springdale and take two shuttles.
Zion National Park entrance fee
You can use the America the Beautiful Annual National Parks Pass to get into Zion (US80 per annum), otherwise it will cost $35 for entry with a car for 7 days, $30 for a motorbike or $20 per person on foot or by bicycle.
As the National Parks Pass is $80 for the year, we felt it was worth it if you plan on visiting more than three national parks in a year.
Packing suggestions for The Narrows
Having the right gear can make a huge difference and the Narrows is a tricky one to pack for. Sometimes it can be cold in the summer! Here’s what we pack and have relied upon for years:
Day Pack: Osprey Talon 22 (we’ve owned this for years). Check on Amazon, REI or direct with Osprey
If you aren’t hiring boots - Merrell Moab (for men and women). We’ve both used these for over three years and they just keep going. Check them out on REI or Amazon
Gloves: Something that can help with the hiking poles - Check on REI or Amazon
Reusable water bottle: To avoid single-use plastic. Check then out on REI or Amazon
For winter
Where to stay in Zion
Cable Mountain Lodge
When it comes to staying in Zion, the majority of accommodation is concentrated in the nearby village of Springdale. We stayed at Cable Mountain Lodge and absolutely loved it.
The lodge is literally steps away from the entrance to the park and the Visitor Centre, meaning you won’t lose any time driving to and from the park!

The rooms here are beautiful, comfortable and have stunning views of the Watchman and Zion Canyon.
Many rooms also come with kitchenettes which allows you to self cater which was a massive bonus for us. It was the perfect place to relax after a long day covering many of the best Zion National Park hikes.
There’s a pool and hot tub with great views. The pool wasn’t open on our visit as it is outdoors but we definitely made use of the outdoor hot tub - even when it was snowing!
Check the latest prices on:
This post may contain affiliate links, meaning at no additional cost to you, that we will earn a small commission if you click through and decide to make a purchase. This helps towards the costs of running our website. :-)
Like it? Pin it!


Follow us on social media
Are you planning a trip to Zion? Would you take on the Narrows hike in the fall? Let us know in the comments below!


