

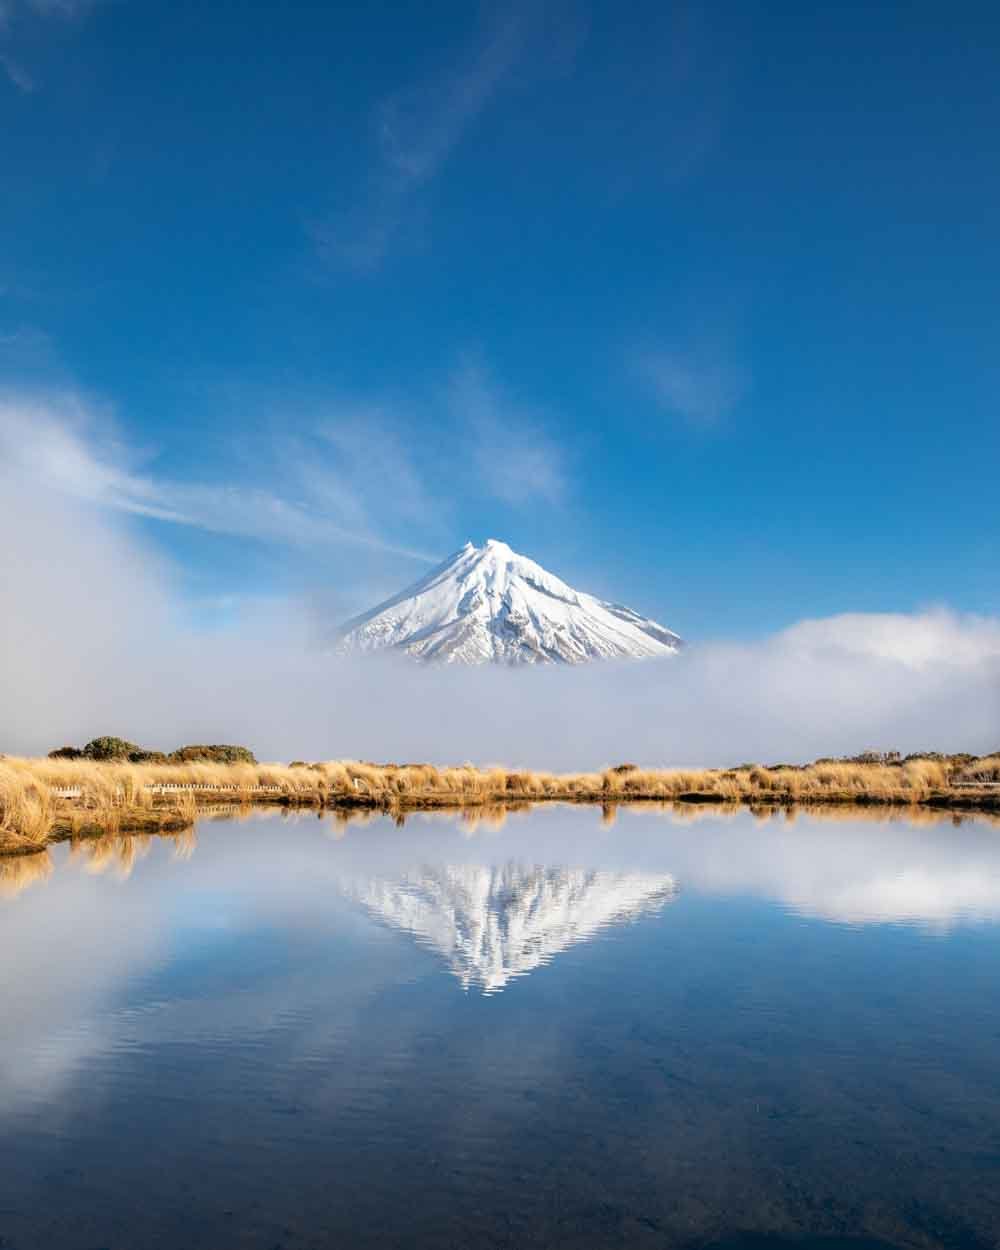
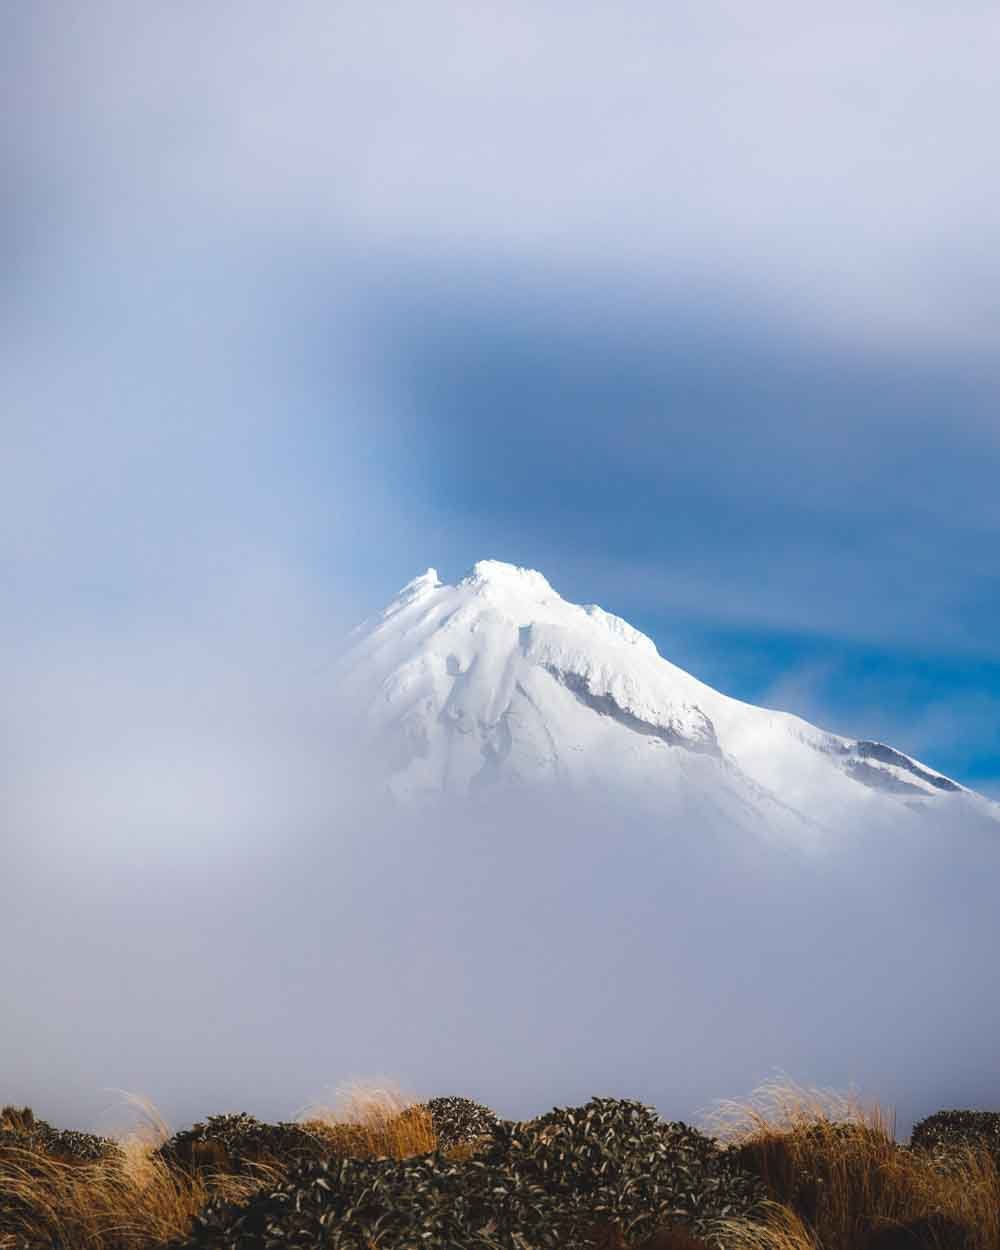
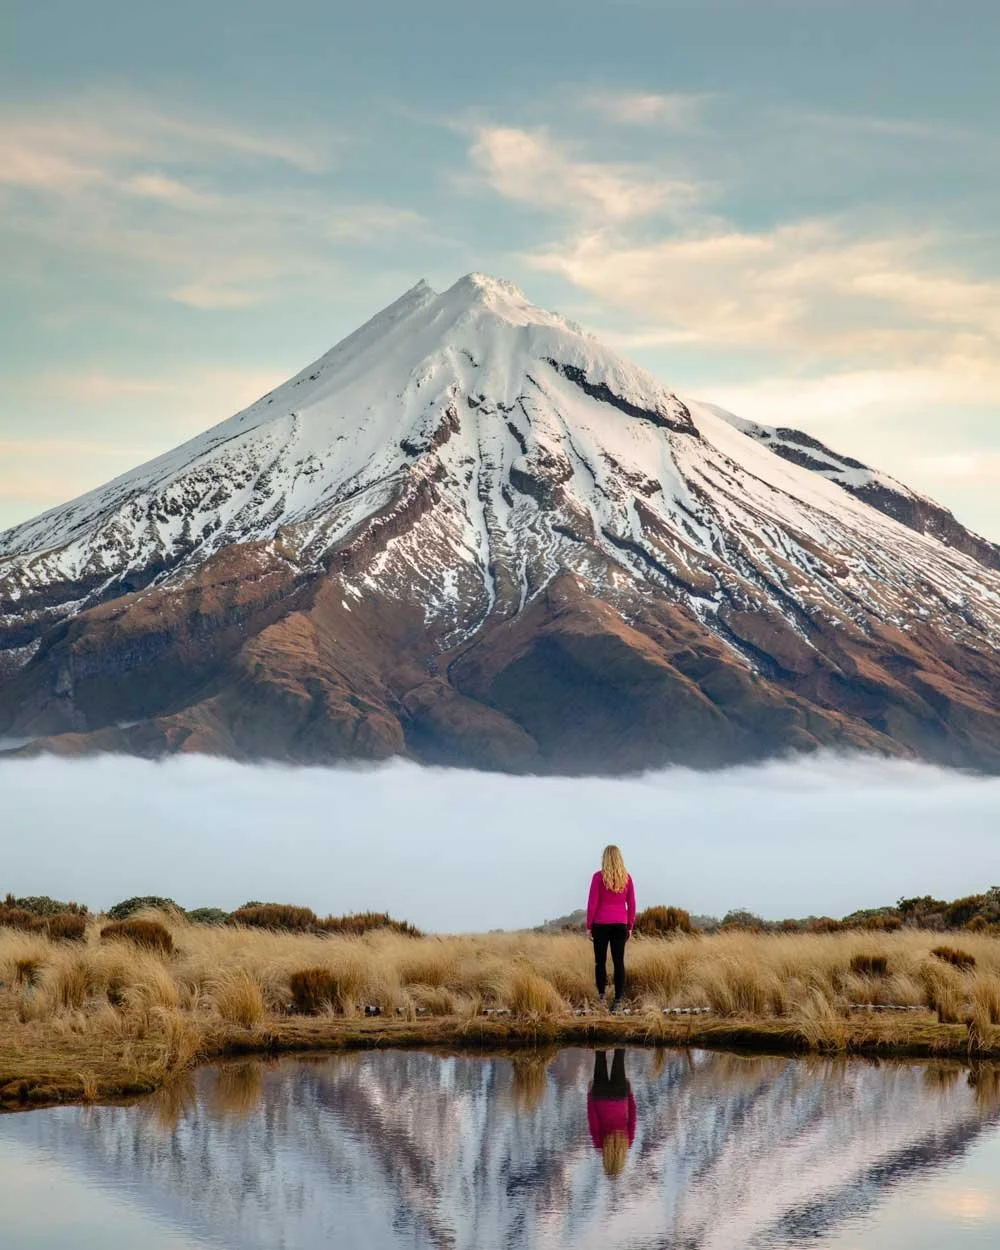
Pouakai Tarns offer the most magical view of Mount Taranaki and in my opinion, one of the most spectacular views in the whole country. In the right conditions - and this is crucial - the mountain is perfectly reflected in the water, creating a scene so magical that it’s really hard to believe that it’s real.
Getting there does require effort, although the track upgrades mean the path is fantastic and it’s really only a case of keeping momentum as you head up the hill.
In this post we’re going to share the exact conditions you need to get the reflection, as well as what to expect from the trail.

Pouakai Tarns: the exact conditions you need for that reflection
Low wind speed
Normally we’d start with all the track details, but in the case of Pouakai Tarns, it’s the conditions that are the most important thing to consider.
You’ll probably already have heard that you need a calm day to get the reflection, but we couldn’t find anywhere online which really went into specifics on that.
We can tell you that for the perfect reflection you need to be aiming for a max wind speed of 2/ms, 1 m/s would be dream conditions. I’ve rarely ever seen 0 so if you spot that then drop everything and go!

Above 4 m/s
About 2 m/s
You can get away with a 3 m/s but it will not be crystal clear, for reference our photos are taken between 2m/s (which we had for mere minutes) and 5 m/s, which is the lowest windspeed we had on our 10 days in the area.
If you have a 4 m/s you will likely get something of a reflection but it won’t be anywhere near perfect.
Unfortunately you can’t get a windspeed measurement for the tarns itself, the closest we could get was the Pouakai Hut, which is just over 1km from the tarn, but it did seem to work out to be roughly the same on our visit.
Low percentage of low and middle cloud cover
Cloud cover is also vital: if you have too much cloud, you could have the stillest day ever and not see the mountain at all. Getting perfectly clear conditions requires some luck, as mountain weather is notorious for being cloudy.
But there are often gaps and that’s why you need to meticulously plan using an hourly forecast if your time in the area is limited and you need to head up on a non clear day.
Before hiking up to Pouakai Tarns, we monitored YR closely, which has very detailed forecasts that tend to be relatively accurate (predicting alpine weather is very hard!). Make sure you click on the “details” tab, and you will find a break down on the right, Cloud Cover %, Fog %, Low % (low cloud cover), Middle % (middle cloud cover) and High % (high cloud cover).
Low cloud, low wind speed at Pouakai Tarns
You don’t need to worry about high cloud cover, as this is likely to be above the mountain and is not really an issue.
Low and mid cloud can be the ones which hide Taranaki completely. You want the lowest percentage possible in the low and mid categories.
For reference the photo below is 39% low cloud cover and you can see that only the top of the volcano was visible.

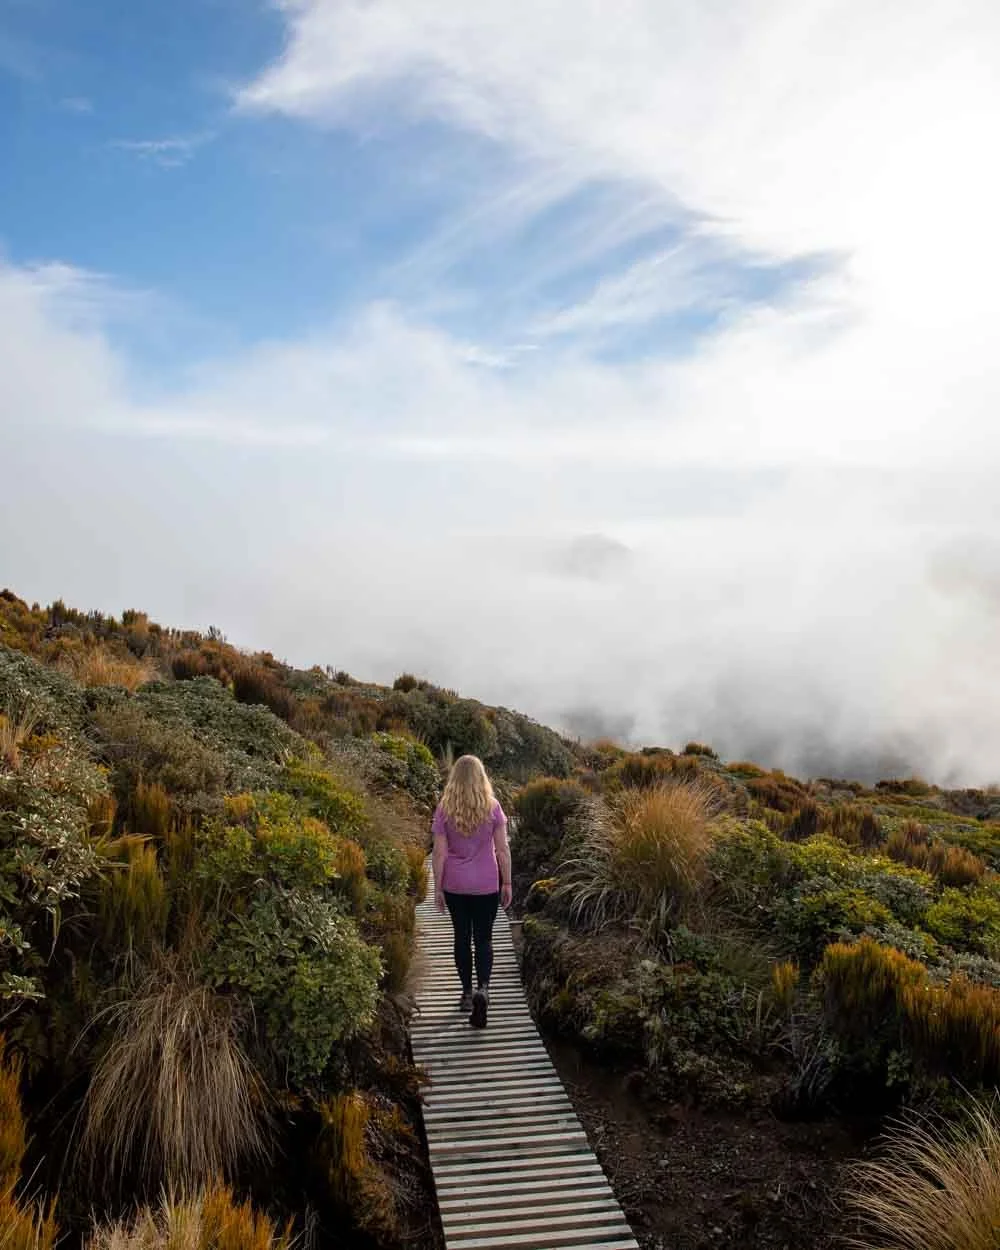
The result of low and mid cloud cover
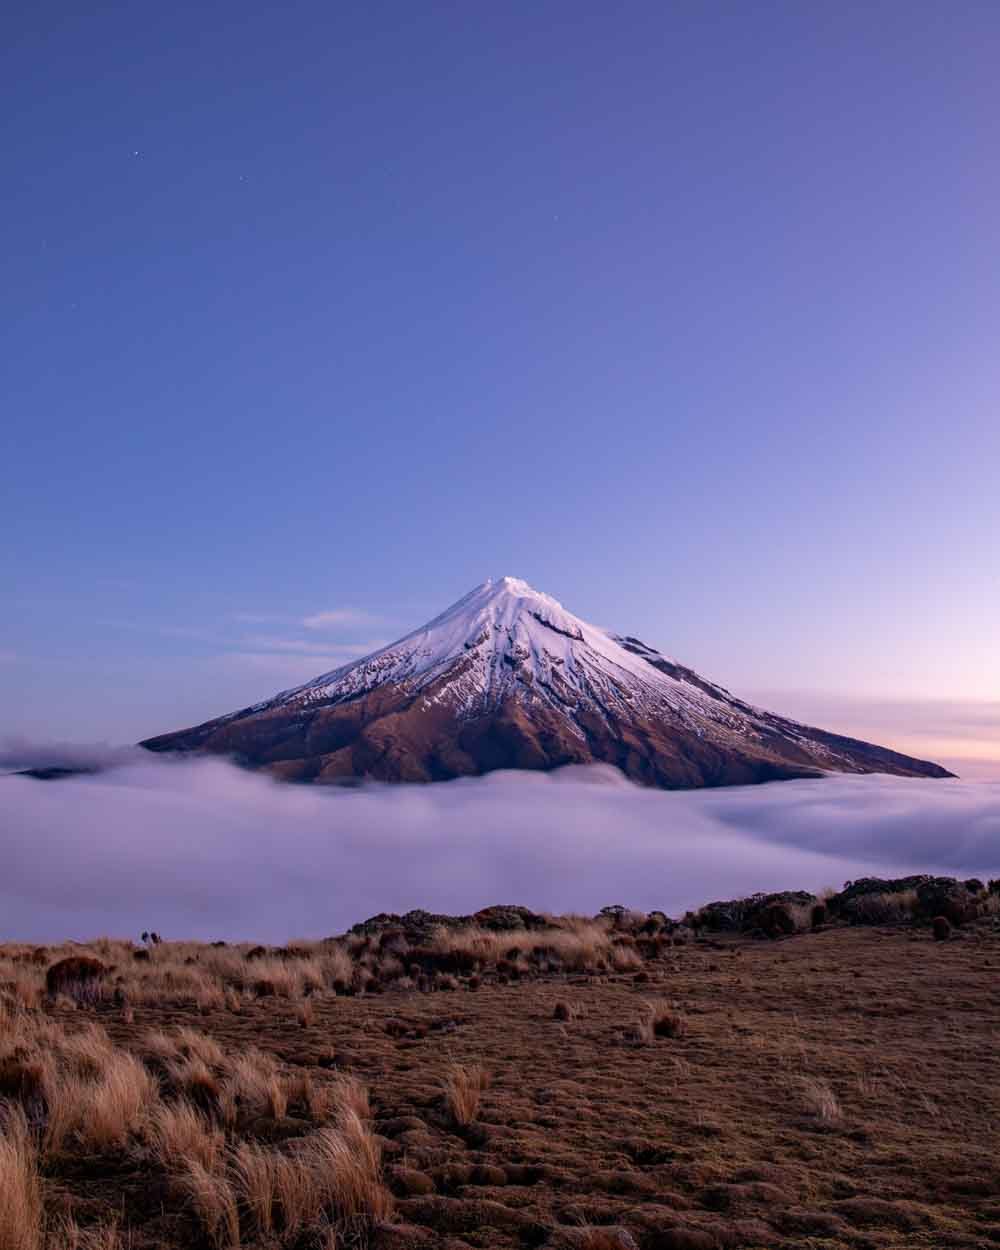
As time went on we got down to a 16% cloud cover which is where you see the small inversion, which we think actually added to the drama of the scene and for me was close to perfect.

The result of a small percentage of low cloud cover
A good amount of time to see if the conditions change
If you’ve planned it all out and the conditions still aren’t perfect, then the best thing you can do is to give yourself time. Mountain weather is notorious for changing quickly. I would recommend giving yourself a good couple of hours at the tarn if you’re really keen.
We stayed 2.5 hours and in that time the weather went from windy and zero visibility on the mountain (you literally wouldn’t know it was there), to the top of the cone being visible and zero reflection, to eventually - after 2 hours - the mountain appearing with a tiny amount of cloud at the base, and a low enough wind speed to have a pretty good reflection.

We met many people who never saw Mount Taranaki that day, some came to the tarn and saw a small amount of the mountain before leaving and missing the true glory of the view when it was fully revealed.
Everyone else bailing meant we spent well over an hour at the tarns by ourselves, which was a really amazing experience - we couldn’t believe our luck!
Just make sure you bring layers as it can get really cold up there and it’s fully exposed. Bring more clothes than you think you’ll need, particularly if you’re planning a sunrise or sunset mission.
The best time of day to visit the Pouakai Tarns
Obviously the best time to visit is when the conditions line up re wind and cloud, but if that just so happens to also line up with sunrise or sunset, then you are definitely winning.
We headed up for sunset and I would highly recommend it as a beautiful time of day to be up there. Sunrise is also spectacular from the photos I have seen.

Of course the best thing to do if you can get a spot, is to stay in the Pouakai Hut and do both. You’d also get the chance to see it under the stars too.
The night sky was amazing up there and had we got a place in the hut we would have definitely gone to check out the Milky Way over the tarn. If you want to see when the core lines up over Mount Taranaki you can use the Photopills app.
To help with your timings, it took us 1 hour 45 to get to the tarn and 1 hour 30 to get back down to the car park again. This was at a leisurely pace, but we didn’t really stop aside from for a few photos.
The Pouakai Tarns Walk: the Mangorei Track
The Mangorei Track is not the only way to reach the tarns, but it is the quickest route and the route we used. It’s your best option for a day hike.
The stats
Distance: 6.3km each way
Elevation: 790m
Difficulty: Moderate

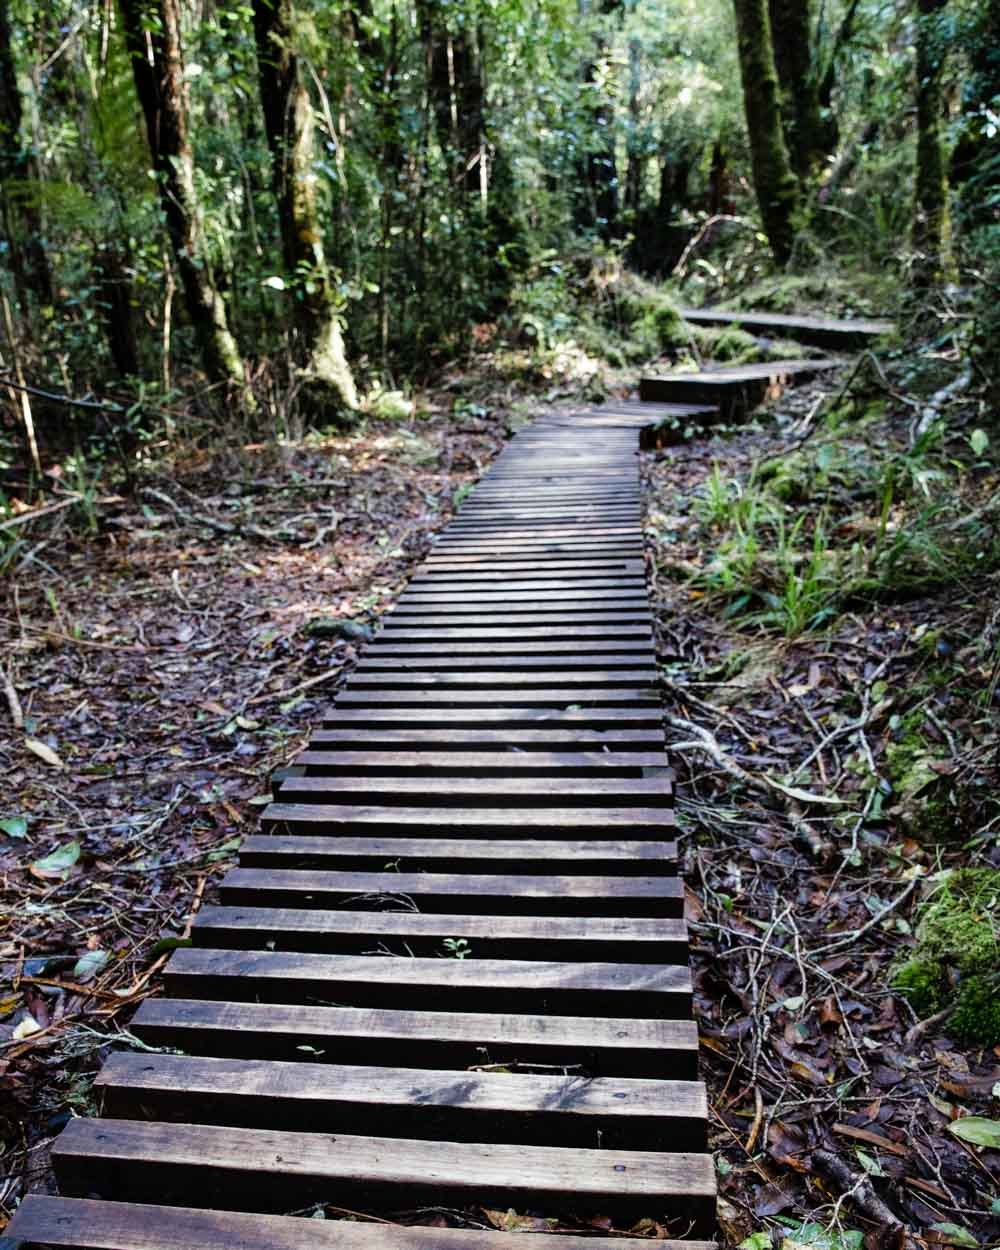
The Mangorei Track to Pouakai Tarns has been upgraded and is in excellent condition. It’s almost entirely boardwalked, which means you’ll find virtually no mud.
When you look at what lurks beneath the slats you’ll be thanking your lucky stars that it has been because it would be seriously swampy!
Although the trail is uphill for virtually the entire way, it’s not overly steep or relentless, but more on that in the track notes below.

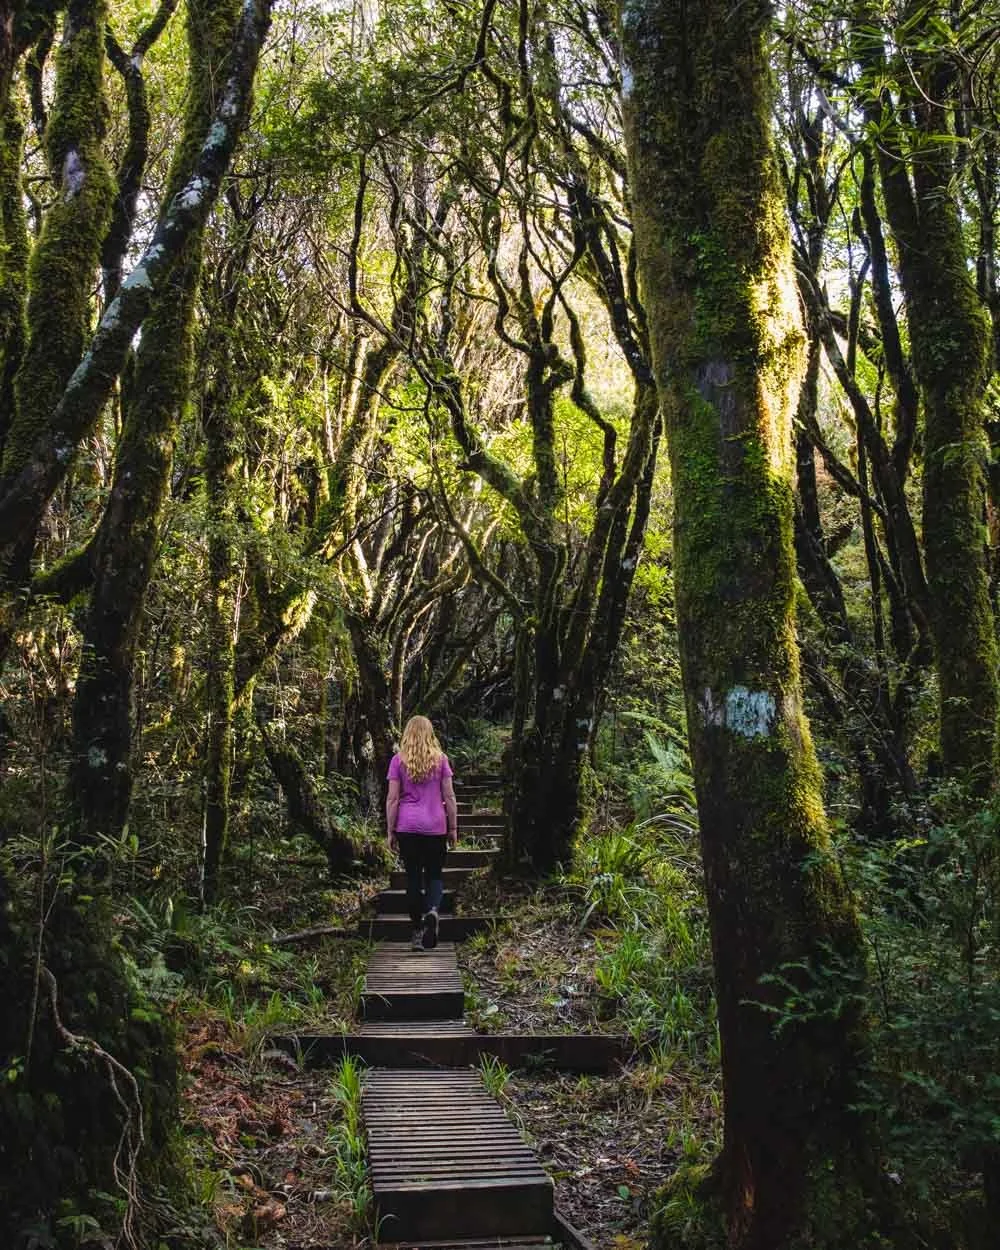
Starting the trail
From the car park the track heads gently uphill along a gravel road for the first 500m. You’ll then enter the forest and hit the proper trail.


Beyond the excellent path, the other thing that makes the trail easier than it otherwise would be, is the fact that the majority of it is under tree cover, so you’re largely sheltered from both the sun and wind.

The boardwalk has smaller than your average wooden slats, which isn’t great for walking pole lovers and can mean that the top of your boots get caught a little - but luckily that didn’t happen too often.
It just meant that I took it a little slower than I would have done otherwise. As I mentioned before though, the boardwalk is a total dream when you look at what lies beneath!
It’s now very much an all weather hike and considering how much it rains in the area that is a very good thing!
The first 500m in the forest is quite flat, there are a few stairs, but it’s shallow and feels very easy. Past this point is where the climb really begins.
Climbing through the forest
After the 1km mark is where the trail becomes steeper and remains that way until you break the bush line several kilometres later.
The good news is that whilst there are a lot of stairs and it is basically uphill all the way, it is never very steep.
For the most part I’d say that you have one step up followed by two on the flat, which makes the climb feel shallow and manageable.
Although the overall elevation gain looks like a lot for the track, this is definitely no Roys Peak!


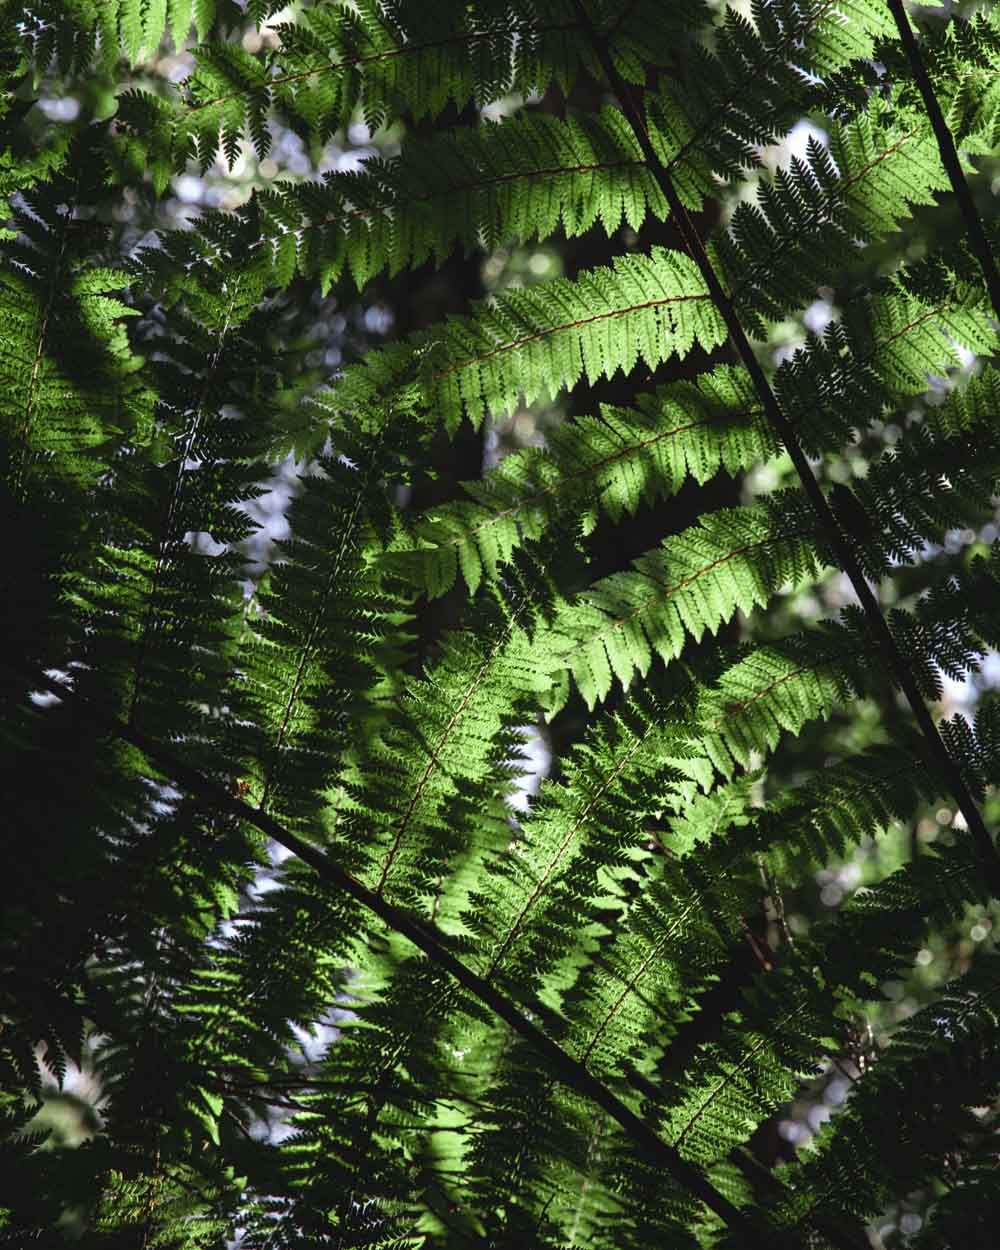
Over kilometres two and three you’ll climb 125m and 160m respectively before you hit a short but sweet flat patch. The forest is gorgeous throughout, with plenty of moss, twisted vines and even some goblin trees.
You’ll see traps what feel like every few metres, which is probably why you hear so much birdsong and made the walk even lovelier.

Breaking the bush line and getting to Pouakai Hut
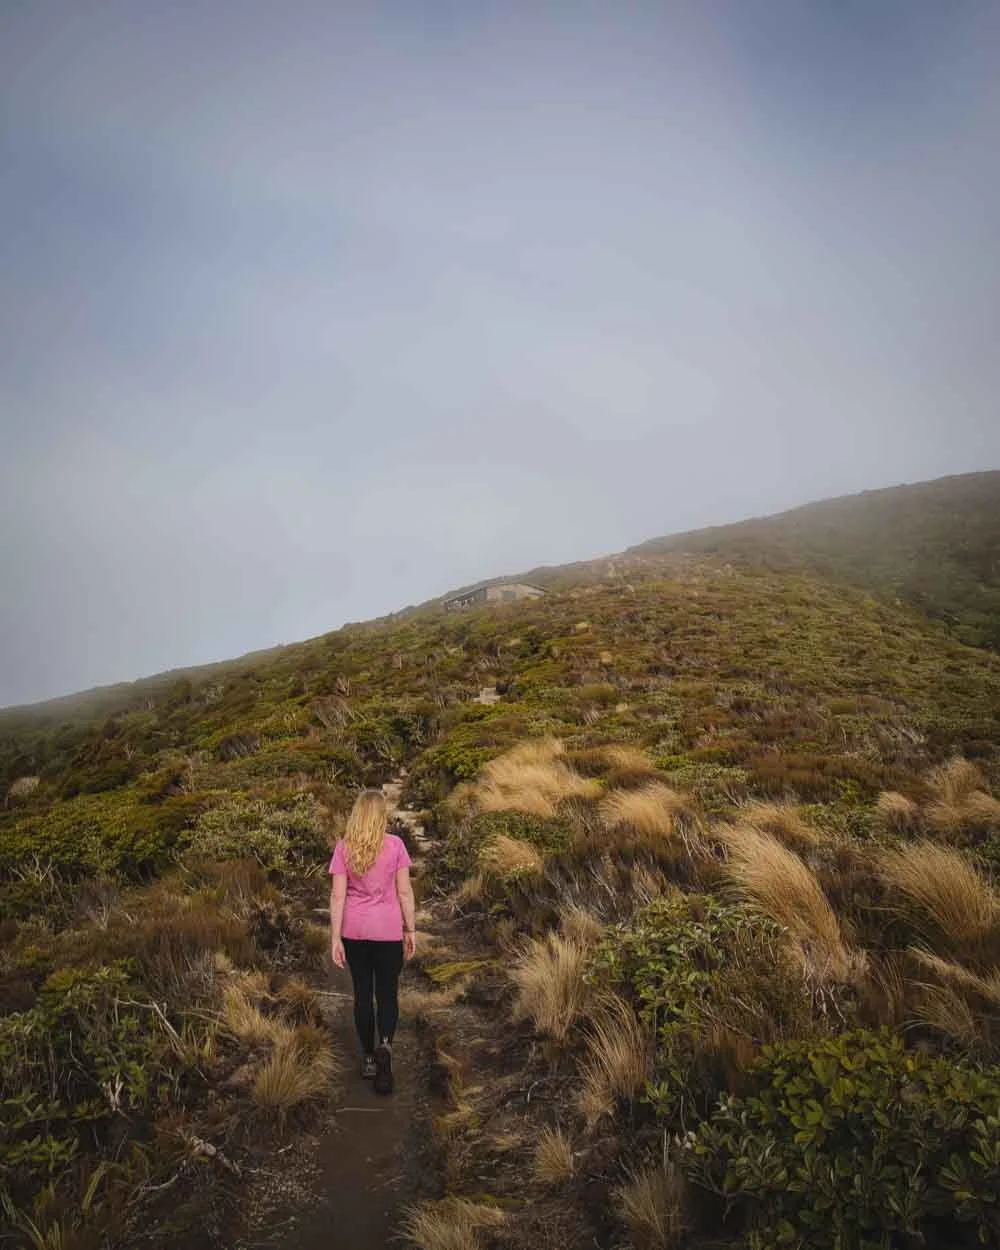
The little flat patch is quickly followed by several steep staircases before you break the bush line and the track mellows again.

If the weather is clear you’ll see the tops of the hills - but don’t worry if it’s not because it’s not necessarily indicative of what’s going on at Mount Taranaki.
You’ll briefly re-enter the bush before you break out again and then you’ll be above the tree line for the rest of the walk.


The track continues to climb, but there are little flat or almost flat sections to break it up. You’ll pass small cascades and start to get some valley views - but again this valley can be cloudy when Mount Taranaki is not.
I am mentioning this because we had a total whiteout here and I started to lose hope that we would see the mountain at all!
It won’t be long before you see Pouakai Hut perched on the hillside in the distance and if you don’t have a bed booked you’ll probably be regretting it - I know we were!

Roughly 5.3km after leaving the car park you’ll arrive at the hut. The valley view from here is beautiful, although you won’t see the mountain, which is in the opposite direction and hidden from sight behind a hill.
For reference, it took us 1 hour 30 to reach the hut and the elevation gain to this point is 675m.

Pouakai Hut has 16 beds (with mattresses), all bunk style, and long drop toilets. Firewood is supplied but you’ll need to bring everything else with you.
The hut is extremely popular and needs to be booked online through the DOC website. At time of writing it’s $15 a night for adults and backcountry passes can be used.

Onto Pouakai Tarns (Ruahumoko)
The hard work is mainly behind you once you reach the hut and you only have around a 15 minute (1km) walk to go.
The first part is uphill, but it’s only for 250m and then you’ll reach a wide gravel area which hopefully offers your first view of Taranaki.
You might see the very tip of the cone before you reach the hut, but this is the first proper view.

It’s a lovely spot to see the mountain with lots of tussocks in the foreground. From here you’ll start heading left and downhill on a very leisurely sloping boardwalk.
There are actually a couple of tarns, but only one that you can visit as you must always stick to the boardwalk to protect the fragile environment.
Once you arrive at Ruahumoko - the official name for the tarns - you will find the whole perimeter boardwalked and there’s a little seating area of sorts at one end.


Hopefully you will now get to enjoy the exquisite view, but remember that time is everything here, you may luck out immediately, but if not, hopefully the mountain will appear given enough time.

You can see why these waters are considered a sacred site, there’s something very special about them and the longer you spend here, the more you feel it.

Even though it was freezing on our visit, the 2.5 hours we spent here didn’t even seem enough!

Heading back down
The walk back down to the car park is easy. You have a tiny bit of uphill to go as you leave the tarn, but then it’s downhill all the way.
The boardwalk means the track conditions are fantastic and even though we were hiking down in the dark we both thought it is one of the easiest descents we’ve done on any hike with a similar elevation gain. You had to be mindful of any wet bits of track in case it got slippery (which it didn’t very often) but otherwise it was a breeze.
Heading back under the stars and listening to the rurus (moreporks) was a really lovely ending to a truly memorable experience up at the tarns.
Getting to the Mangorei Track, the Pouakai Tarns trailhead
The Mangorei Track trailhead is located 19km and roughly an 18 minute drive from New Plymouth. There is a very large car park, which is free and has no time limit. There are toilets at the trailhead and then again at the Pouakai Hut.
This post may contain affiliate links, meaning at no additional cost to you, that we will earn a small commission if you click through and decide to make a purchase. This helps towards the costs of running our website. Thanks for your support.


