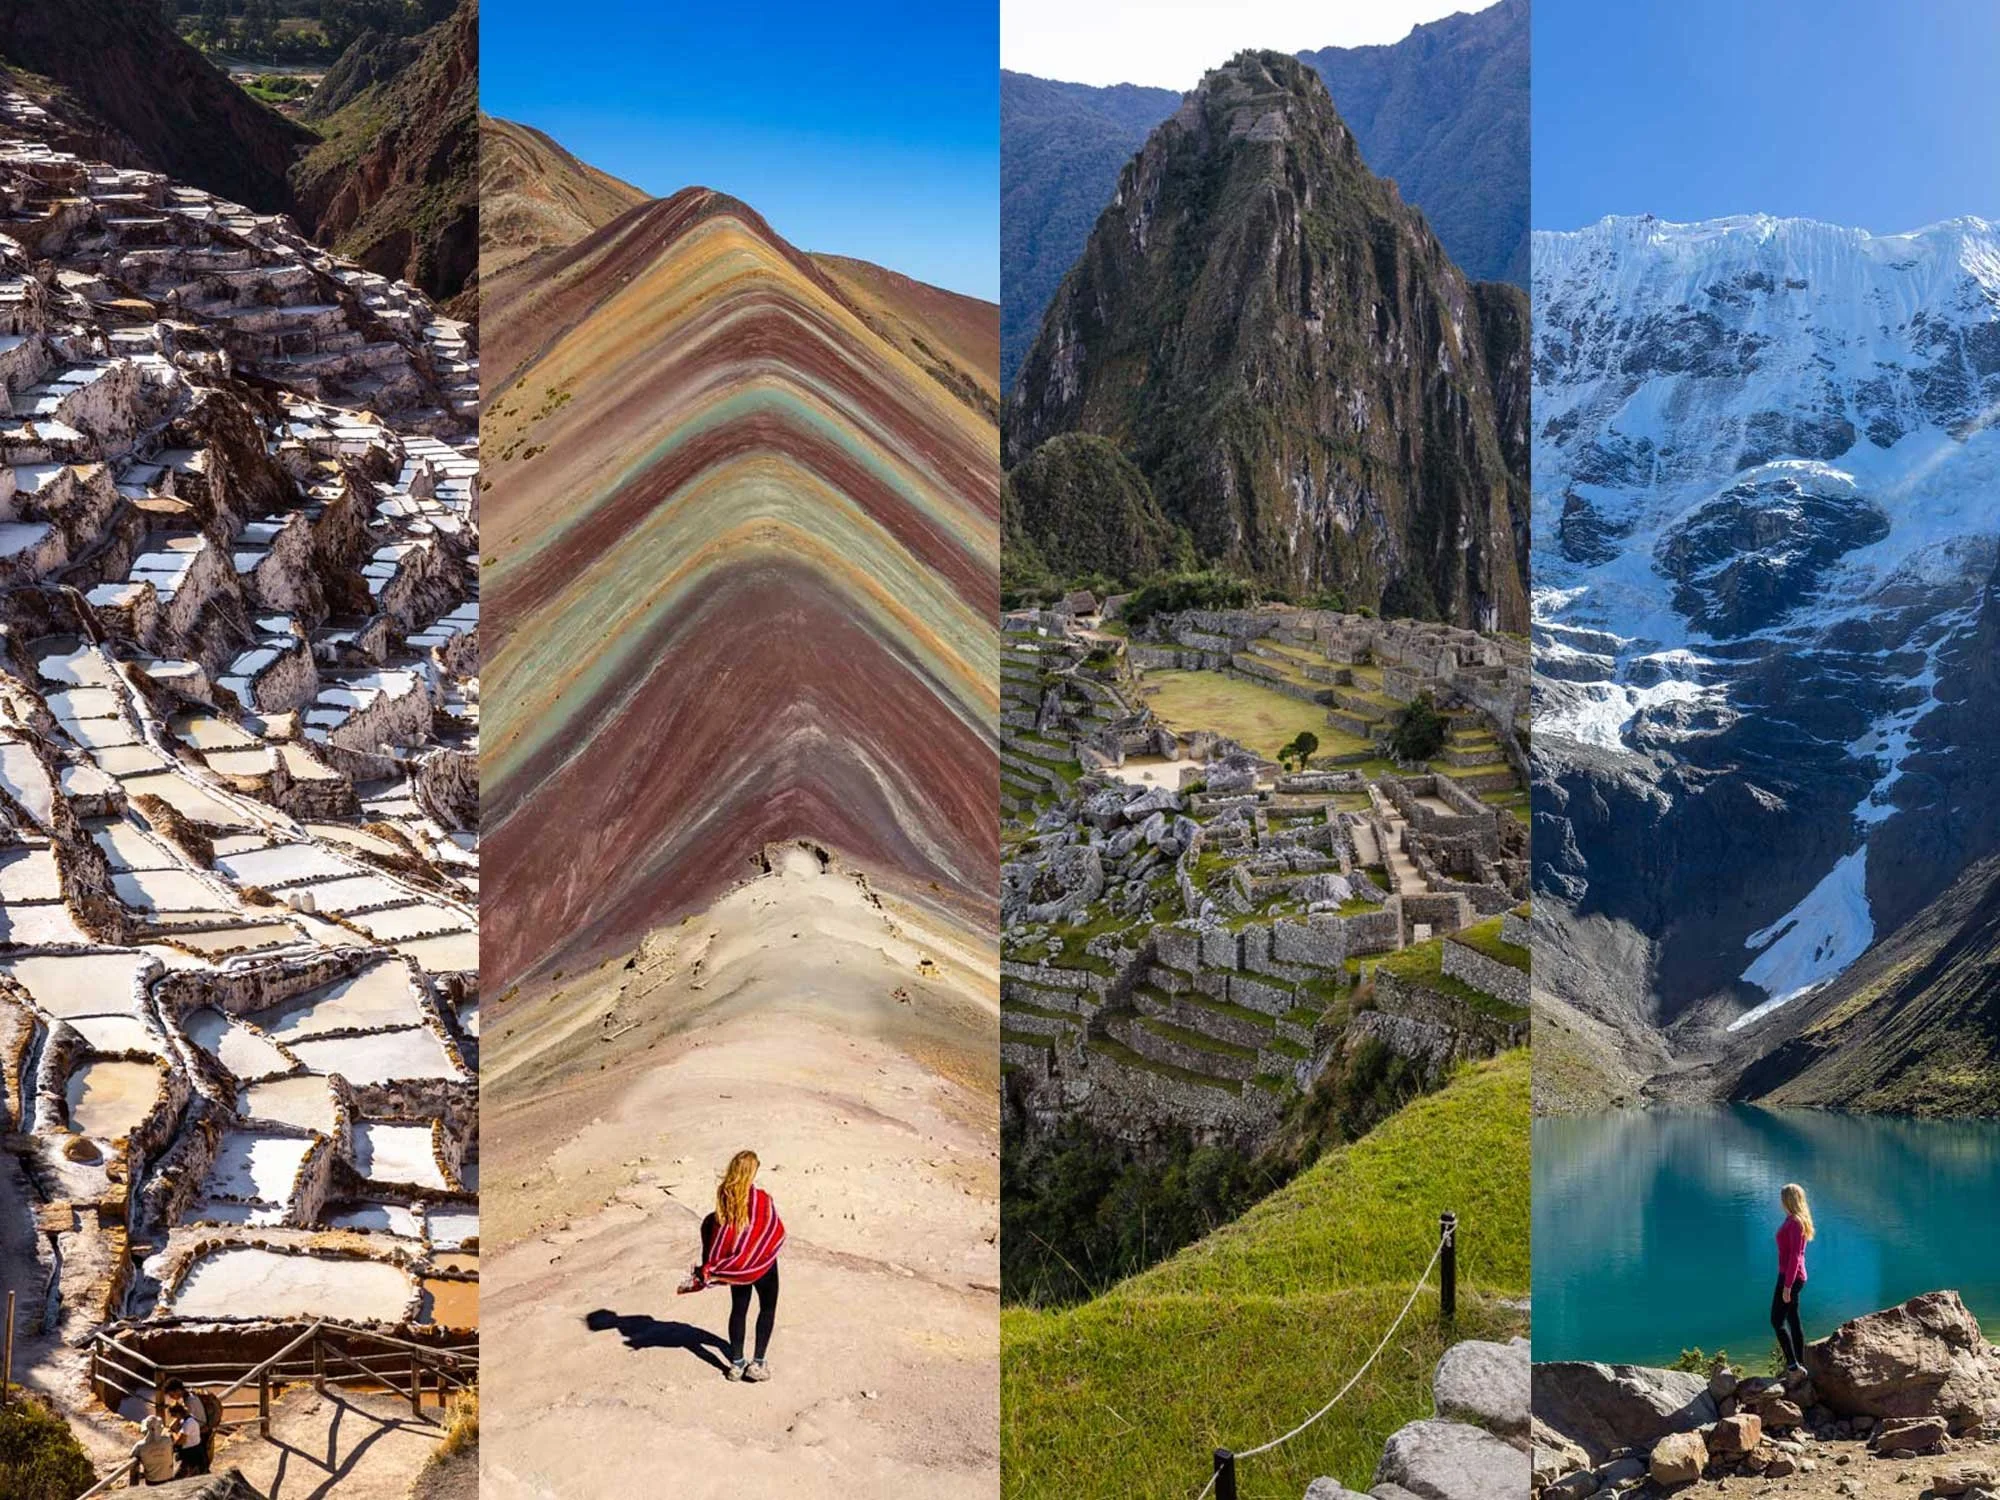
Rainbow Mountain. I’d seen the pictures and whilst they look incredible, I couldn’t help but wonder whether it would actually live up to the hype. After all, it’s easy to add a lot of wow factor to pictures in Photoshop. I was pretty much expecting to be a little underwhelmed which made it all the more special when it turned out to be absolutely spectacular; however, there’s a caveat to this. You need sunshine to bring out the colour and you need to visit outside the times that the huge tour groups arrive. I doubt anything could live up to expectations when you have to view it alongside 500 other people - and that is not an exaggeration.
In this guide we’re sharing exactly what to expect from the hike, how to beat the crowds, photography tips and why you should also visit the Red Valley as part of your Rainbow Mountain (Vinicunca) hike.

How to get Rainbow Mountain to yourself
It’s almost impossible if you take a group tour
Don’t underestimate how crowded it gets at Rainbow Mountain. There are two huge car parks which at peak tour times are packed to the rafters with minivans. It feels much busier than Machu Picchu - which is pretty mind blowing - although granted Machu Picchu is big enough that it can better disperse the crowds.

The biggest problem is that the vast majority of tours to Rainbow Mountain arrive and depart at the same time and everyone is heading to the same two viewpoints.
You may be able to avoid the worst of the crowds if you hop on one of the tours that leave Cusco at 3am, but you’ll need to be prepared to go fast when you get there. Don’t come on the wildly popular 4am and 5am departures as that is when most tours leave Cusco.
The key thing to realise is that 99.99999% of visitors to Rainbow Mountain go on a group tour, which leads on to our tip to get Rainbow Mountain to yourself.

Take a private taxi & visit in the afternoon
Taking a private taxi is the best way to avoid the crowds at Rainbow Mountain, without having to sprint like an olympic athlete after getting on a tour bus at 4am.
Our driver picked us up at a humane 8am, which meant we arrived just before 11am - the time when most of the groups begin heading back down from the viewpoints.
This meant that by the time we got to Rainbow Mountain there were about 15 people at the viewpoints (the mass exodus coming down as we were climbing up was more like what you’d expect to see at a concert than a mountain hike).
Although 15 people was great (for reference this was just after midday), we wanted to be up there alone and that is definitely possible. After enjoying the lookouts, we headed to the nearby Red Valley (a short walk away) and then returned to the lookouts at 3.30pm. This time we were there alone which was simply incredible. However, now we’ve done it we would have planned it slightly differently, so we didn’t have to climb up to the lookouts twice, which brings us on to point three.

Visit the Red Valley first
So as not to climb the stairs and lookouts twice, we’d recommend visiting the Red Valley first. When we visited, Rainbow Mountain was empty from about 3pm - you may get lucky and it clears earlier, but 3-3.30pm should be a safe bet. The stall sellers may be packing down the last of the stalls, but otherwise it should be all yours.
Going before the tour groups would be another good option, but you’d have to leave Cusco very early, before 3am (although you have some leeway as the groups all stop for brekkie). The other problem with going this early is that they may not open the road (they put a chain across it and this is where the entry tickets are sold), if you are considering this, check with a local first as it would be awful to go that early and not be able to get through.
The other option is adding Rainbow Mountain onto a longer hike if you’re planning to do the Ausangate Circuit. I’ve seen people advertise these treks as having sunrise and sunset add ons to see Rainbow Mountain without the crowds.

The best conditions for visiting Rainbow Mountain
Pick a sunny day with low wind
Ideally you’ll want to visit on a sunny day, this will bring out the colours on the mountain. I have seen pictures from Rainbow Mountain on an overcast day and the colours are really dull and faded, which would definitely mean it loses some of the wow factor.
We’ll be honest up front - whilst there were no people around, we did do a little Photoshop to remove the closed snack stands (they were quite distracting), but nothing else. Unfortunately, though the stands close after the tour groups leave, they are never removed and are visible from the top (best) lookout.

If you’re taking a private driver, you can book according to the weather forecast when you get there (this isn’t like Machu Picchu where there’s a limit on tickets and they sell out months in advance).
Weather forecasts in the mountains are notoriously unpredictable, but we did find our usual go to website to be accurate for every walk we did in the area. We use this website - and it has a reading for Vinicunca, the official name of Rainbow Mountain.
You will then want to go to the details tab and check for the percentage of cloud cover.

You want as little cloud cover in all categories as possible, so you get maximum colour. If you can’t get a clear time period, then you want as little cloud cover in the low and middle categories as possible to make sure the mountain tops are visible (high cloud should sit above the mountain peaks).
You’ll want to check for the weather from 11am onwards if you plan on using our hack to escape the crowds.
Note that the wind can pick up in the afternoons, but it wasn’t too bad and we picked lack of crowds over a still morning.
Ask about recent snow
It can snow in the Vinicunca area at any time of year. So before you go, check with your driver as to whether it has snowed recently and if there is any snow still sitting on Rainbow Mountain. We’ve heard stories about people who have turned up only to see a white blanket of snow covering it!
We noticed on the weather website that snow was forecast on the day we planned to visit and were able to delay our trip by a day to let it melt. Depending on the level of snow it can even melt in an afternoon and a good guide/driver will know that and be able to advise you.
Everything you need to know about the hike to Rainbow Mountain
The stats
Distance: 7.6km return to the upper viewpoint at Rainbow Mountain (7.2km return to the lower viewpoint)
Elevation gain: 380m
Difficulty: Hard due to altitude
Summary: The terrain on the Rainbow Mountain hike is all pretty good. The majority of the way it’s a wide gravel path and as you get towards the viewpoint there are a few staircases to climb. The best viewpoint is actually a little higher still and this section has a bit of loose gravel and the odd rocky bit, however when dry it wasn’t slippery at all (despite the fact it looked it).
The majority of the path is either flat or a gradual uphill climb for around half the distance, and only the last section is very steep. However, at this altitude even a gentle incline can feel like hard work and it’s common to feel breathless and even develop a bit of a headache. We have some tips towards the end of the post on the best way to get acclimatised for the hike, which will help make it as easy as it can be.
Despite the fact that the majority of the track is not steep, the end definitely is, so if you’re not used to hiking it may feel more challenging than you would expect given how popular it is.
Starting the trail
From the car park there is a very short little steep bit to climb before the path will almost flatten. Although the mountain scenery is amazing, the track itself is a little underwhelming as it’s a sandy gravel path that runs parallel to the horse riding trail.
This means that when a few horses go by together they tend to kick up all the dust. It’s a far cry from the beautiful and quiet hiking trail at Palccoyo Rainbow Mountain.

At the end of the first kilometre you will have covered just 60m elevation gain, so it will feel all but flat. From the 1.2km mark you will start to notice it get a little steeper.

The track gets steeper
Although you will feel the path steepening, it’s still quite gentle for a little while longer. At the 1.4km mark you’ll pass a little area of stalls selling drinks and snacks, there was even someone offering freshly squeezed orange juice if you need a little pick me up!
There are also toilets here, which you’ll need to pay for and are likely not as nice as the ones at the car park (which you also need to pay for).

The track will briefly get a bit steeper and then largely flatten again. At the end of the second kilometre you have covered 130m in elevation gain, so it’s only a fraction steeper than the first kilometre and most people will find it pretty easy.
If you do want a little break, there’s a bench seat at the 2.2km mark and you can enjoy the mountain views, no doubt complete with an alpaca or two in the valley below.

It’s from this point that the path will get noticeably steeper, and includes a gravel hill which is short, but a bit of a slog. It will slacken off again before you reach the main horse station at the 2.9km mark. You’ll find more shops and a toilet.
On the way up to Rainbow Mountain the horses continue for another 300m, but as it is steep, they don’t descend this last bit with passengers, so on the way down people must walk this short section.

Incidentally, it’s better not to use the horses because they aren’t always in the best condition and it’s hard work for them. It’s also worth noting that even if you take a horse you will still need to walk the last 400m-500m (depending on if you visit both viewpoints), which are the steepest of all.
If you don’t fancy walking, you can take an ATV from the other side of the mountain which gets you closer to the viewpoint, although not the whole way.

Reaching the lower viewpoint
You have just over 250m climbing on a gravel track between the main horse station and the final staircases to the lower viewpoint.
It’s quite steep and it’s from this point that most people slow down and start to really feel that altitude.

Along the way (3.3km) into the trail you will pass the turn off for Red Valley. If you have the time I’d highly recommend heading into the Red Valley, it’s exceptionally beautiful and very quiet.
We’ll cover what to expect at the Red Valley after the trails notes for Rainbow Mountain.


The final steps up to the lower viewpoint are steep and uneven, but wide and they aren’t slippery. They run for just under 200m and then you’ll reach the lower viewpoint.

Once you’ve reached the lower viewpoint you’ve walked for 3.6km and climbed 320m in elevation. It took us 1 hour and 10 minutes to reach this point at a slow, but fairly steady pace.
Rainbow Mountain lower viewpoint
The lower viewpoint offers exceptional close up views of Rainbow Mountain. The colours on the mountain really are incredible and as vivid as they look in pictures on a clear day.
However, it’s not just the colour that makes the mountain a spectacle, it’s the steepness which gives it a really dramatic feel. That’s what puts it on another level from the beautiful, but less dramatic Palccoyo Mountain.

We’ll warn you though: don’t come expecting a wild experience. Unfortunately right beside the lower viewpoint you’ll find a lot of food stalls, selling everything from alpaca meat and chocolates bars, to beer.
You can even get your passport stamped! It does spoil the atmosphere from my perspective, although people did seem to love taking pics with the llamas in sunglasses, so we might be alone in this thought.

When it comes to the lower viewpoint, people queue to take pictures here, so you can easily get shots with no one in them. However, they aren’t nearly as good as the ones from the upper viewpoint.
The upper viewpoint
The upper viewpoint is 180m and another 60m in elevation gain above the lower viewpoint. It’s basically the hump behind the main viewing area and where you’ll find the Rainbow Mountain sign. At the top viewpoint you’re standing at an altitude of 5046m.

For whatever reason a security guard stands up at this higher viewpoint and tells you to move on quite quickly. They don’t do this at the much busier viewpoint below, which is only 60m lower in elevation, so I can’t see that it’s altitude related.
The top of this hump was a lot windier though, so it may have something to do with that. The rest of the area was more shielded from the wind.
However, if you follow our hack and come later in the day, then the guard has gone home, so you don’t need to worry about rushing!


The upper viewpoint is steep to climb, but easy enough as it’s mainly made up of rocky steps, and only the odd bit of loose gravel. It offers unparalleled views of Rainbow Mountain looming steeply ahead of you.
It’s also where you’ll get the best photos, most of what you’ve seen on Instagram will have been shot at this viewpoint as it offers a unique perspective.

The difficulty with photos from this spot though is that unless you find a clever angle, it’s almost impossible to get shots without people in them.
You’ll have people down on the lower viewpoint and climbing up to the upper viewpoint. It’s yet another reason we recommend coming in a private taxi outside the times the tour groups visit.

Once you’ve finished at the viewpoints, you can either return the way you came, or add on the Red Valley hike.
If you return the same way, it’s all downhill and even the steeper bits are quite easy (in the dry season at least). If you have time, adding on the Red Valley hike will definitely not disappoint.
The Red Valley hike
Stats
Distance: 1.5km each way (you could go further and make a circuit, but it got a bit sketchy)
Elevation gain: 90m
Difficulty: Easy - moderate
The Red Valley is exceptional; at one point it feels like you’re walking on Mars! I loved it. Added to that, it’s so quiet, it’s not hard to get this surreal landscape all to yourself. You will need to pay extra to visit, at two different points, so bring cash. Both tickets are 10 soles (approx USD $2.50) not sure why you pay in two instalments, but trust me, it’s worth it.
There are a few different ways of hiking the Red Valley and some are longer and harder than others. We did an easy version because the path got a bit sketchy on the circuit route we originally planned to do and as we were in the valley entirely alone, we decided to err on the side of caution.

Beginning the Red Valley Walk
The start of all routes from Rainbow Mountain into the Red Valley begin at the junction just below the stairs up to the lower lookout (it’s 250m from here) and it’s signposted.
You’ll head along a narrow gravel path that climbs gently uphill.

Roughly 50m after the turnoff you’ll come to the first checkpoint and pay your 10 soles. The scenery is already good at this point, but when you reach the mirador (lookout) it is simply jaw dropping.
Approximately 450m after the first ticket point you’ll reach a junction, it’s not signposted, but take the path on the left. You will be heading uphill pretty much all the way, but it’s not steep and the path is in decent shape.


Just after this left turn there is a short sharp uphill section, but it only lasts for 130m before it flattens as you make you way to the entry gate for the valley (the second ticketed area). In total from the lower Rainbow Mountain viewpoint to the official entry gate for the Red Valley is 950m.

The views become unreal
It’s from here that the scenery goes from really good to show stopping. You could walk for only a few minutes along this section of track and the ticket price would be worth it.
The mountains are a mix of deep rusty red and purple, with some green valleys to add even more colour into the mix.

When we walked in June some were also partially snow covered, which added extra wow factor. I can’t think of many places in the world where this viewpoint would not be the main attraction in the area.
It’s wild that so many people don’t venture here despite its close proximity to Rainbow Mountain. However, that makes it all the more special for those that do, as you won’t have to worry about crowds.

The official mirador (lookout) is 200m from the entry gate, but every step is like a viewpoint really, it’s that amazing.
The path along the Red Valley to the mirador is a narrow gravel trail, but very easy to walk on when dry.


I imagine when wet it could get quite muddy and at times would also be under snow, in which case you’d probably want Yaktrax or similar to get some grip.
We also recommend checking with locals if it would even be safe in the snow, as the path is really narrow and you might not be able to see it clearly enough.

The path itself is red and you’ll begin walking alongside a huge red mountain, which is where I started to think about Mars!
You can continue along this easy track from the mirador for 150m before there’s a junction and the circuit track continues to the right, heading steeply uphill.

Heading back
After walking for a few minutes we decided to turn back because the path is really narrow, steep and a bit slippery. Given we were alone in the valley, we decided not to chance it and simply retraced our steps back the way we came.
It looked like there were a few possible tracks to take in the area, but our taxi driver had warned us there were routes that finished hours away from the car park, so keen not to stray on to one of those we decided the same route back was safest. This is where a good guide would definitely come in handy!

When you’re heading back you don’t have to go all the way to the junction with the lower viewpoint again, you can cut down earlier than that to head back to the car park. Just pick a route that looks easy enough to you.
However, if you only want to walk the easy return bit we mentioned, then we’d recommend going to the Red Valley first, so that you arrive at Rainbow Mountain later in the day and therefore after the tour groups have left.

Rainbow Mountain entry fee and transport costs
The entry fee for Rainbow Mountain is surprisingly tiny. Like Red Valley it is charged in two lots: the first is 5 soles per person (approx USD $1.25) and the second is 20 soles per person (approx USD $5). The toilets cost 2 soles.
You can buy group tours for as little as 60 soles (approx USD $16.50). They tend to include food, but not the entry fees mentioned above.
Our taxi cost 290 soles (approx USD $75), it wasn’t the cheapest price you could get, but we were confident the service would be good and it was.
We organised it through Roxana from Vibrant Peru tours. Arturo, our driver was brilliant and had a good car with working seatbelts (not always a given in Peru). He was so sweet, always opening the car door for us and telling us we could take as long as we liked and still smiling when we took waaaaaay longer than your average person!
We paid full price for our trip and don’t profit from any bookings, we’re passing on the details because we thought they were great. You can get in touch with Roxana on Whatsapp, her number is +51 984 260 053.
Getting to Rainbow Mountain - the road condition/driving yourself
Another alternative is hiring a car from Cusco (we paid less than USD $30 a day) and driving yourself. You may be wondering if we had a hire car, then why didn’t we just drive ourselves? Well we’d read online the road was crazy. In reality the road is gravel and narrowish in places, but it’s not too crazy.
In fact, it was one of the better dirt roads we saw. The actual dirt road section is about 30km long and takes about 55 minutes to drive. Much of it is not on steep mountain roads, but heads through villages and valleys.
That’s not to say there aren’t any steep sections, but there aren’t too many. There are some big unfenced cliff edges, but the road is not overly narrow. If you are confident and have experience driving on dirt roads you will probably find it ok, providing you do not drive against the flow of traffic.
Drive slowly and cautiously and never against the flow of traffic, ie, if you’re planning to go in the afternoon, do not attempt it at the times that the tour groups drive out. It’s just not worth the risk of having to pass people on narrow sections.
You don’t need a 4WD or big Land Cruiser to drive to Rainbow Mountain (most taxi drivers do it in a Toyota Corolla), but you will be more comfortable in a car with some clearance. I would be wary about driving to Rainbow Mountain in the rainy season as the road might become challenging.
To get to Rainbow Mountain by driving yourself, ignore Google Maps (it will take you to the eastern side where the ATV’s go from). Take the dirt road that heads east just before the town of Cusipata. You’ll see on Google Maps that it ends at “Rainbow Mountain Trail Overlook Deck” - you can also find it by clicking here.
Facilities at Rainbow Mountain
There are toilets in three different locations along the trail. The most basic being the one at the lower lookout. All cost a few soles, so bring cash. There are multiple places you can buy drinks and snacks, including coca tea, so you’ll never go hungry or thirsty.
Expect to pay more here than shops in a town, a snickers bar was 8 soles (approx USD $2) and a coca tea was half that cost.
Vinicunca vs Palccoyo Rainbow Mountain
I’m not going to go into too much detail here because we have a whole guide dedicated to it, but here’s a quick overview: Palccoyo Mountain is less dramatic than the original Rainbow Mountain (Vinicunca). Vinicunca is very steep which does make quite a difference, it’s also a bit more colourful - but you do need direct sunlight or the colour can appear dull and faded.
Palccoyo is a much easier, and for me, more enjoyable walk, it’s also less crowded and less developed. If you want more details then check out our Palccoyo vs Rainbow Mountain guide.

Tips for handling the altitude at Vinicunca Rainbow Mountain
The first and most important tip is to give yourself an absolute minimum of 48 hours in Cusco before attempting Rainbow Mountain - and the more time the better. A good rule of thumb is to not advance more than 500m each day, but that’s virtually impossible in this area as Cusco is 3,500m, and Vinicunca is 5,046m.
However by spending some time in Cusco it will help. Humantay Lake sits at 4,200m, so do that one first if you’re planning on it. Similarly, some of the ruins around Cusco city are up at around 3,700m (Sacsayhuaman) so that’s another little helping hand.
I would then recommend sipping some coca tea when you get to the trailhead, you could also bring coca leaves to chew, but we preferred the tea and had several cups.
Take the walk slow and steady, so you don’t get too breathless.
Remember some level of breathlessness and maybe even a headache is normal, but anything more than this could be a sign of altitude sickness and it’s best to proceed with caution and descend.
This post may contain affiliate links, meaning at no additional cost to you, we will earn a small commission if you click through and decide to make a purchase. This helps towards the costs of running our website. Thanks for your support.