

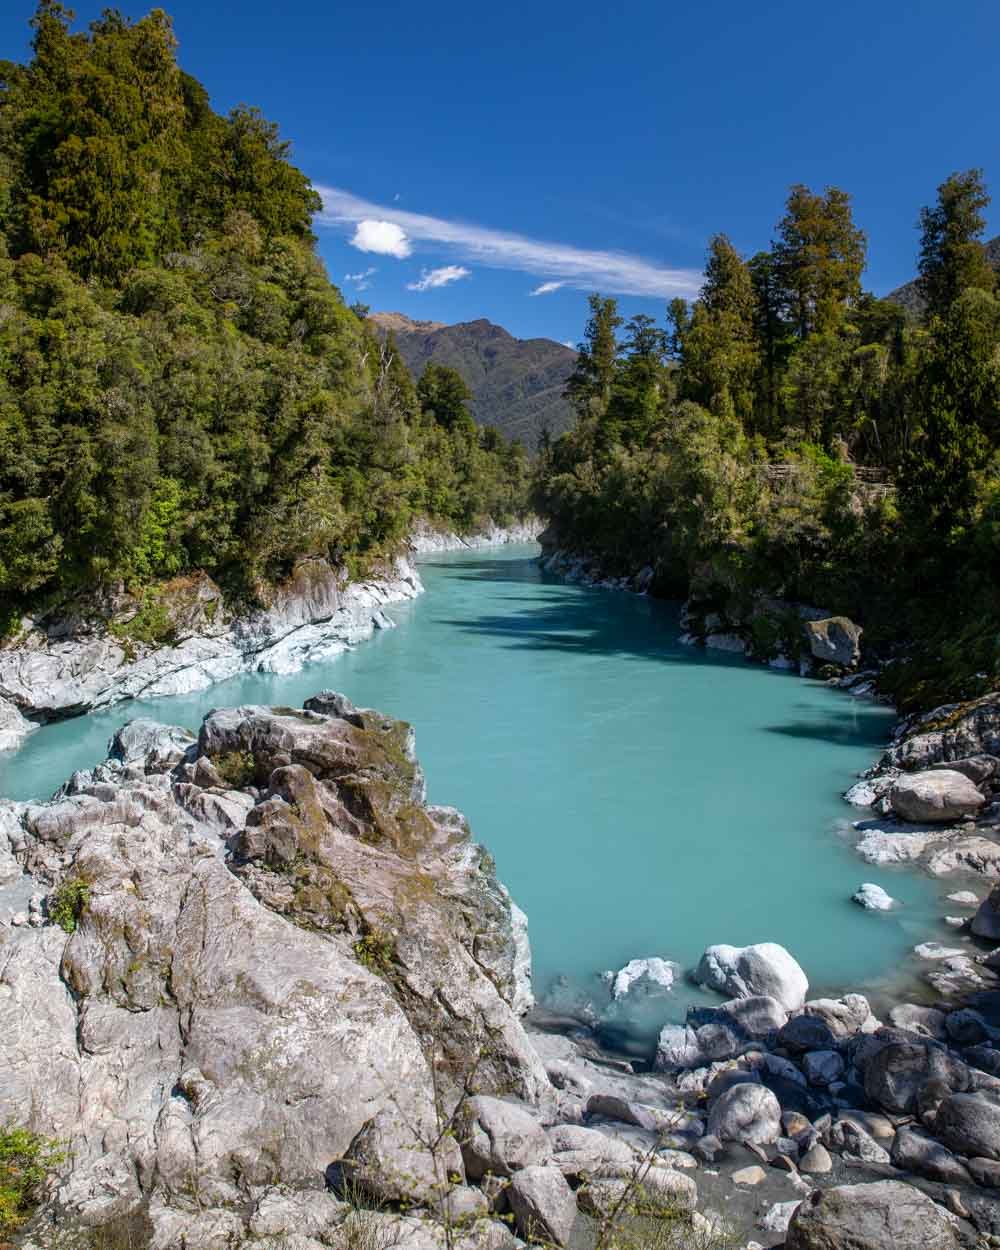
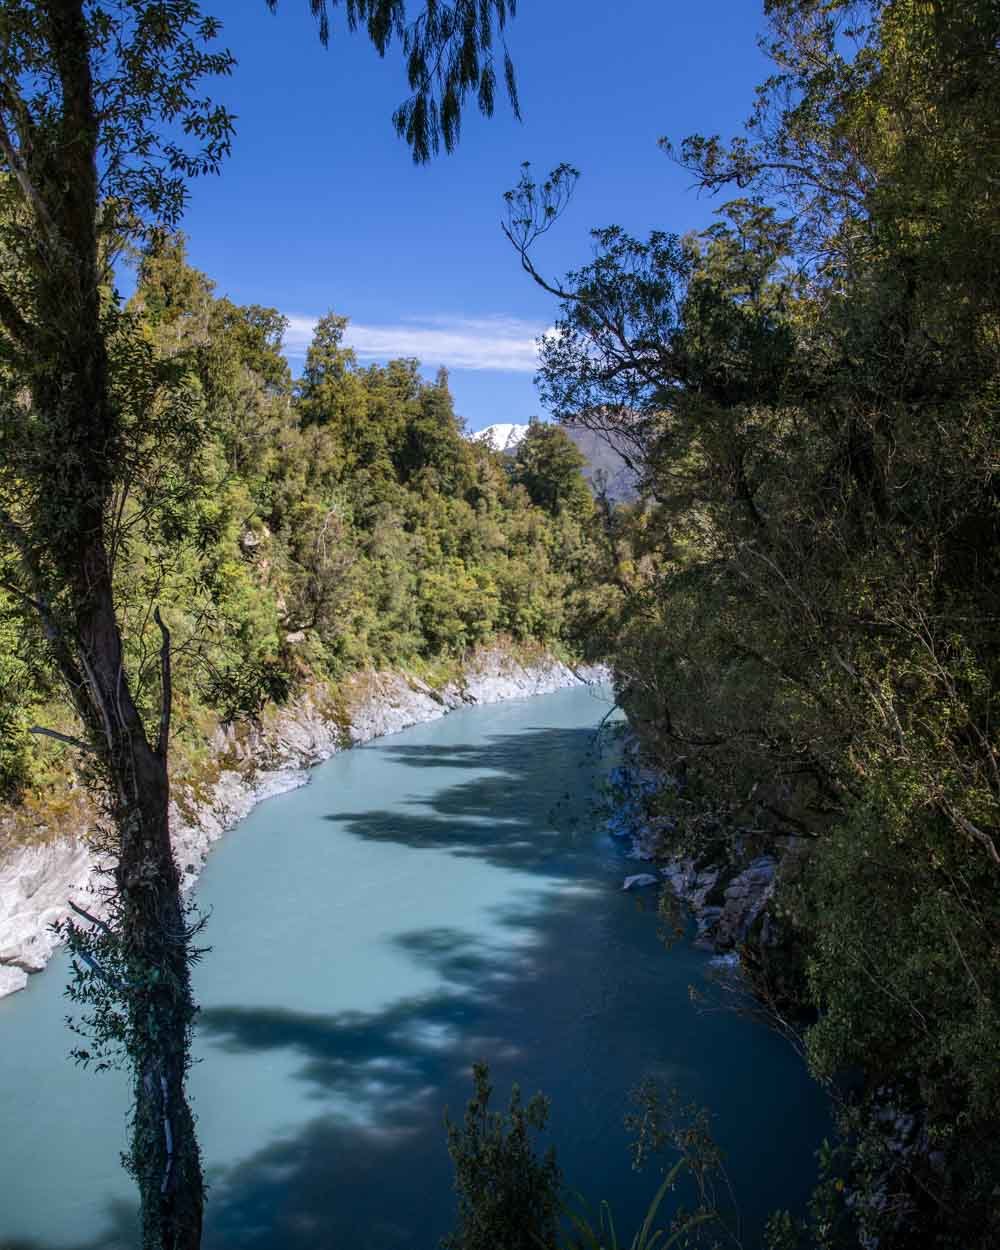
Hokitika Gorge is spectacular, the water is an incredible blue which almost doesn’t look real and the silvery gorge walls are dramatic. There are two epic swing bridges which if you’re lucky with have a backdrop of gorgeous snow-capped mountains.
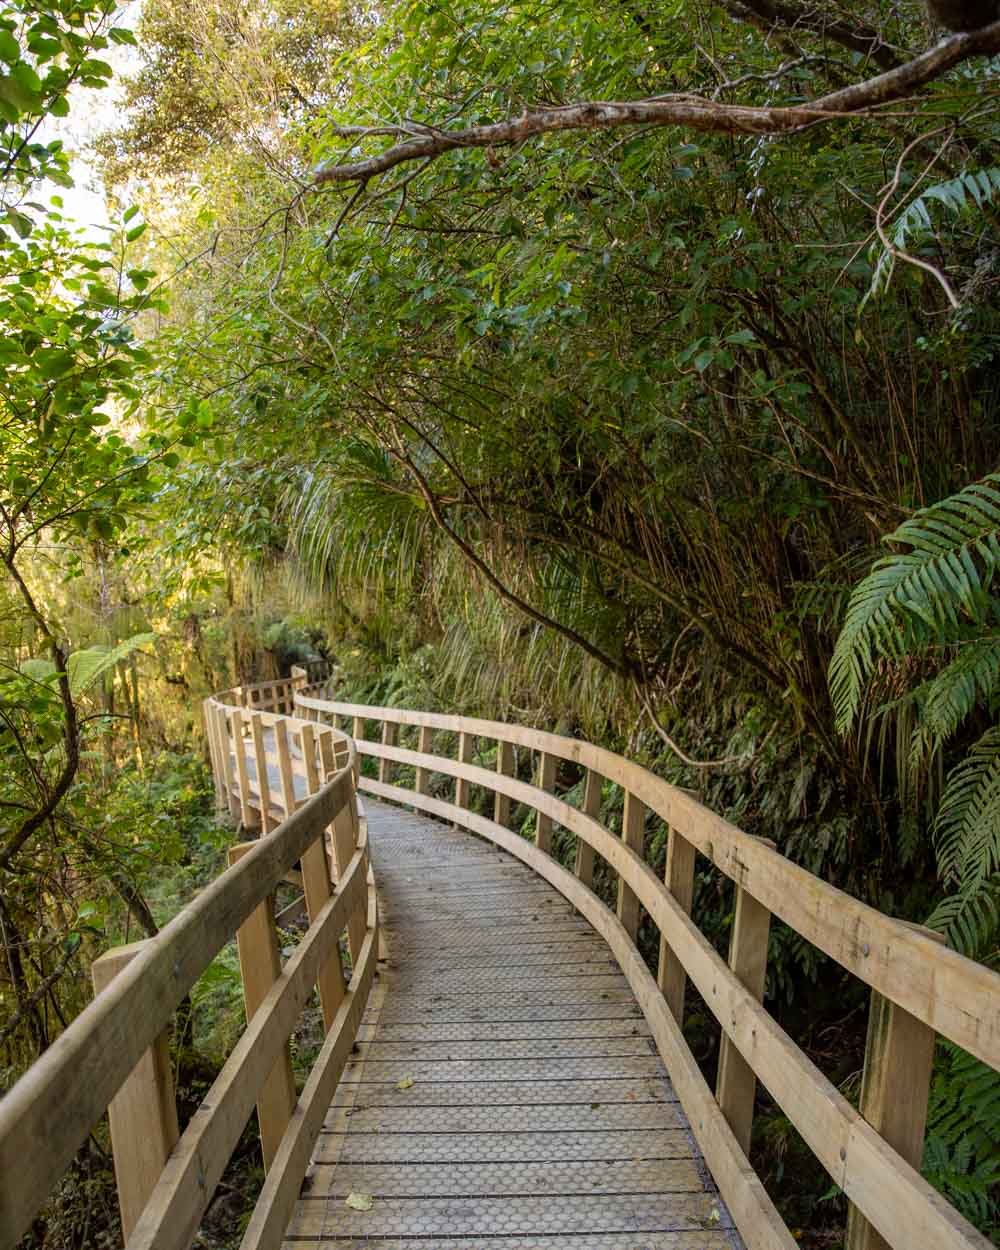
As well as being absolutely stunning, it’s also very easy to access, with an almost entirely flat walking trail. It’s recently been extended to form a loop, taking you to see more of the gorge and easing some of the congestion along the trail.
It might be an easy walk, but there are definitely some things you need to watch out for when planning the perfect trip to the gorge; including when the water is bluest and how to make sure it comes out in photos.
Here are our top tips for visiting Hokitika Gorge.

Top tips for visiting Hokitika Gorge
The water runs murky after heavy rain so if you’re making a special trip to the area just to see the gorge you’ll want to make sure the water is blue. How blue it is also varies, depending on both rain and conditions (time of day, cloud cover etc). We have personally never been lucky enough to see it at its most blue so hopefully it will be even more impressive when you visit!
If you aren’t sure about whether there has been heavy rainfall you can check with the Hokitika I-site or look at recent posts on Instagram (but as many people don’t post in real time I would also drop a comment asking if the picture is recent).
The middle of the day with full sunlight is when the water will look at its most blue, but it’s also when you’ll find the harshest shadows. Cloudy days provide even light, but the water will not be as bright, so it’s a trade off.

3. The gorge is incredibly popular so if you want the chance of sharing it with just a few others you’ll want to come at sunrise (it’s also quieter at sunset). If not, just come with patience and wait for gaps in the crowds in order to take pictures with no one in them.
4. The sandflies are pretty crazy in the gorge so bring repellent. The Bushman 40% deet works relatively well. They don’t really go for you when you’re on the move, but stop to take pictures or simply admire the view and they swarm. They are at their worst in the rocky area where everyone likes to take photos!

5. Generally speaking it’s not safe to swim in the gorge due to the strong current. Although people sometimes do, there have been accidents and it’s not worth the risk. If you’re looking to take a dip in some equally blue water (in fact it’s more blue!) then try nearby Cesspool Gorge. The swimming hole isn’t massive but it’s safe, spectacular and well off the beaten track.
6. Do the whole loop trail, don’t just turn back at the main rocky lookout, you’ll get to cross another epic suspension bridge, which at 90m is one of New Zealand’s longest.
Photography tips for Hokitika Gorge
Hokitika Gorge is a beautiful place to photograph, but can prove to be tricky in terms of light and conditions. Here are a few tips.
Bring a polariser - This is the most important photography tip we have. As Hokitika Gorge is a relatively open gorge, it means that as soon as the sun is up, it will cause glare. A polariser can prevent this, producing a nice even colour on the water.

Glare on Hokitika Gorge without a polariser
Reduced glare using a polariser
Amazon stock several polarisers, but make sure you check the diameter of your lens before you purchase. Once you’ve screwed it on, twist the polariser until you see all that glare disappear. You can check out the latest polariser prices by clicking the button below.
2. Light - As mentioned above, the time of day will strongly determine how your photo will come out. The main lookout faces south-west, meaning that the sun is always behind you. The water is at its bluest on a clear day once the sun is high in the sky (i.e in the middle of the day), but this creates some harsh shadows.
3. Sunrise & Sunset - Sunrise and sunset have the softest light, but the water colour doesn’t pop as much. As the main viewpoint faces south-west, you will be looking in the opposite direction to where the sun rises or sets. The softer colours can be beautiful in their own right and it will be much better in terms of harsh shadows.
The Hokitika Gorge Walk
The stats
Distance: 2km
Elevation gain: 40m
Difficulty: Easy
The Hokitika Gorge walk is an easy and almost entirely flat loop, it’s gravelled the entire way. It’s a trail that most people will find very easy and took us 35 minutes for entire walk at a leisurely pace.
Starting the trail to the first swing bridge
As the track is now a loop you can walk it in either direction, but it’s better to go with the flow of the crowds, which means walking anticlockwise (the signs direct you this way too). If you aren’t planning to do the full loop and only want to complete the original part of the track, as far as the rocky lookout, this is also the route you should take.
The path heads into a pretty patch of native forest and you’ll be standing at the first lookout after just 150m. The lookout offers a great view of the original swing bridge, which is more rustic than the new one further along the trail. It’s especially picturesque and the best place to take photos of just how amazing the setting is.

To reach the bridge you continue for another 300m (450m in total) through the forest. The path heads gently downhill and it’s kept nice and shady by the dense forest.

Walking across the bridge is a highlight of the trail with it’s gentle sway and phenomenal views of the deep blue water - which even had a couple of ducks passing by when we visited!

Continuing to the Instagrammer’s favourite lookout
After the swing bridge you’ll head back into the forest and continue along the easy path towards the rocky outcrop, which is where the majority of Instagram photos are taken. The turning for the lookout is just 100m from the swing bridge and then it’s less than a minute to the viewpoint. This spot will give you the best view of the gorge and also a great vantage point for photos. It’s also the most sandfly ridden place along the whole trail and you’ll want good repellent with you.

To get down onto the rocks you now need to walk through a wooden gate and past the warning sign. The sign tells you about the dangers of swimming, but also the slippery rocks. The reality is that the rocks are quite grippy when dry, but would definitely be slippery in or after rain. Take care if standing on the far rocky outcrop.
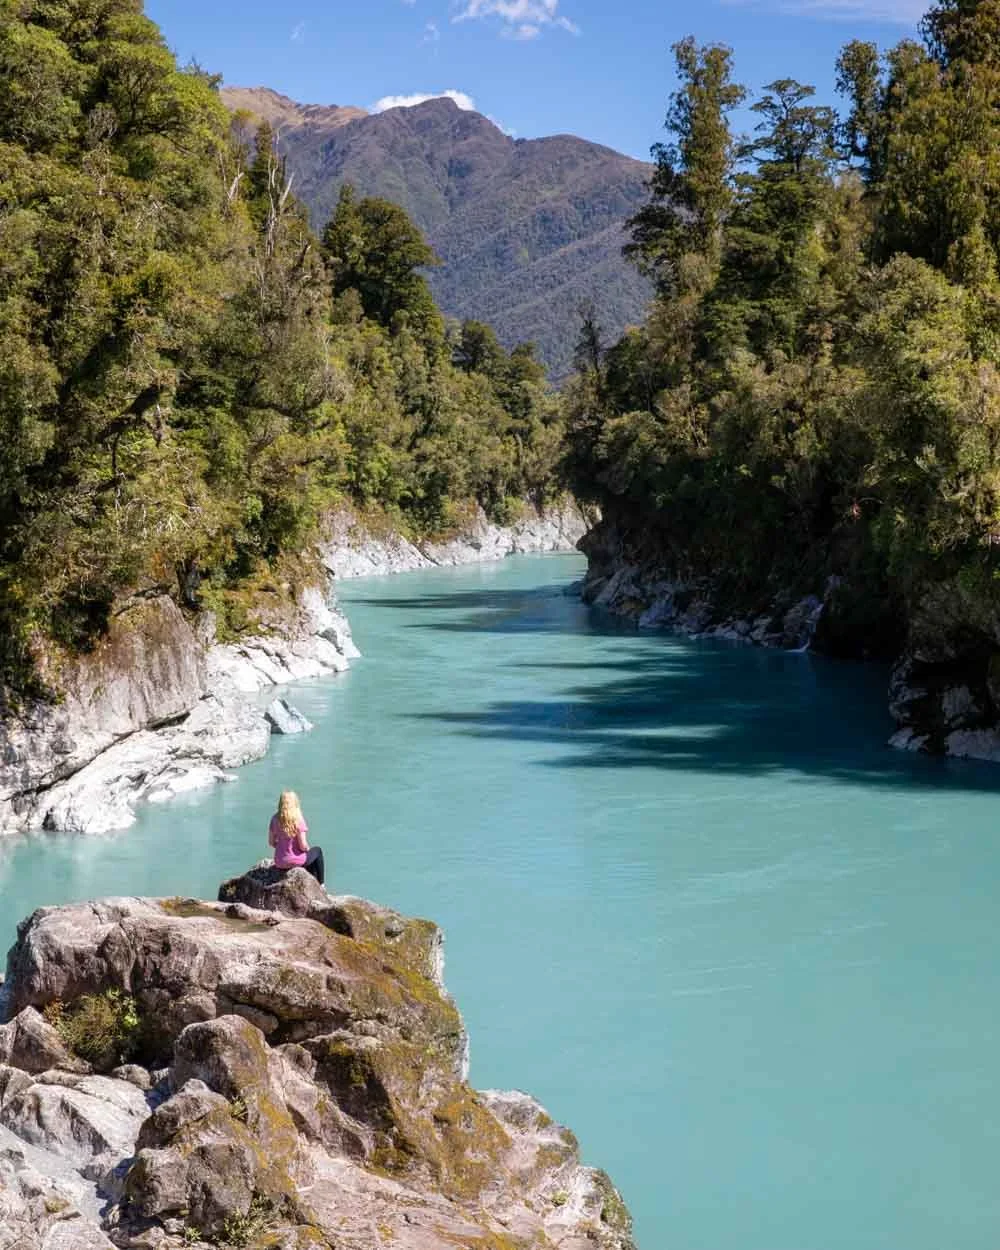
To get down, there are a couple of wooden staircases and then it’s a short rock hop over to the edge. Not difficult, but I wouldn’t do it in flip flops/jandals! Unless it’s really windy, the sandflies are rife here too, so sitting on the rocks looks really serene but then quickly becomes a bit of a swat-fest. The view is worth a bit of discomfort though!


Onto the second swing bridge
Just 150m beyond the rocky lookout you’ll come to a third viewing platform. This one looks into the narrow part of the gorge. It’s not as good as the other two views, but a nice addition to the trail as it’s a part of the gorge that you couldn’t see before the track was extended.
There’s also a bench seat and less sandflies, so it’s a better spot to stop and take it all in.
After lookout three, the trail continues in the forest and it’s very beautiful and serene, with plenty of birdlife. You’ll arrive at the next trail highlight after another 350m, the Hokitika Gorge Suspension Bridge which was opened in 2020.

This 90m bridge is wider and sturdier than the first one, but equally fun to cross, with great views of the gorge in one direction and snow-capped mountains in the other.


Finishing the loop
You then head back into the forest and come to another lovely spot after 300m. There is an open view of the mountains and another bench seat to enjoy it from. I loved the fact that the new part of the trail allows you to get so many extra mountain views that you could never see before.

This is the last view of the track as the rest of it continues through the forest. There are some little climbs, but it’s so gradual that you barely feel it. It really is an easy walk which offers some incredible views and fantastic native forest.


Facilities at Hokitika Gorge
There are flush toilets at the gorge car park which is quite a novelty when the majority of other similar spots only have long drop. There are also some picnic tables sitting underneath a great mountain view, which make for a very picturesque lunch spot.
Please carry all rubbish out with you.
Getting to Hokitika Gorge
The drive to the gorge from Hokitika takes around 25 minutes and is just under 30km. It’s a pretty drive with rolling farmland and mountain views. The road is narrow at times but it’s sealed all the way. There is a large car park which is free to use and there is no time limit.
This post may contain affiliate links, meaning at no additional cost to you, that we will earn a small commission if you click through and decide to make a purchase. This helps towards the costs of running our website. Thanks for your support!


