It’s pretty hard to take a bad picture in Yosemite but some photography spots are definitely better than others. The most important thing to be aware of is how big Yosemite actually is, with some quite long drives involved so you will need at least a few action packed days to see the best of them.
We spent over a week in the park and will share our favourite Yosemite photography spots from those that you can drive right up to, to those that require a bit of effort to reach on some epic hiking trails.
Our favourite Yosemite Photography Spots
These are the 15 best Yosemite photography spots:
The Map
The map below shows all the top photography locations in Yosemite. You can access a google maps verison of this map (marking the exact locations) by clicking on this link.
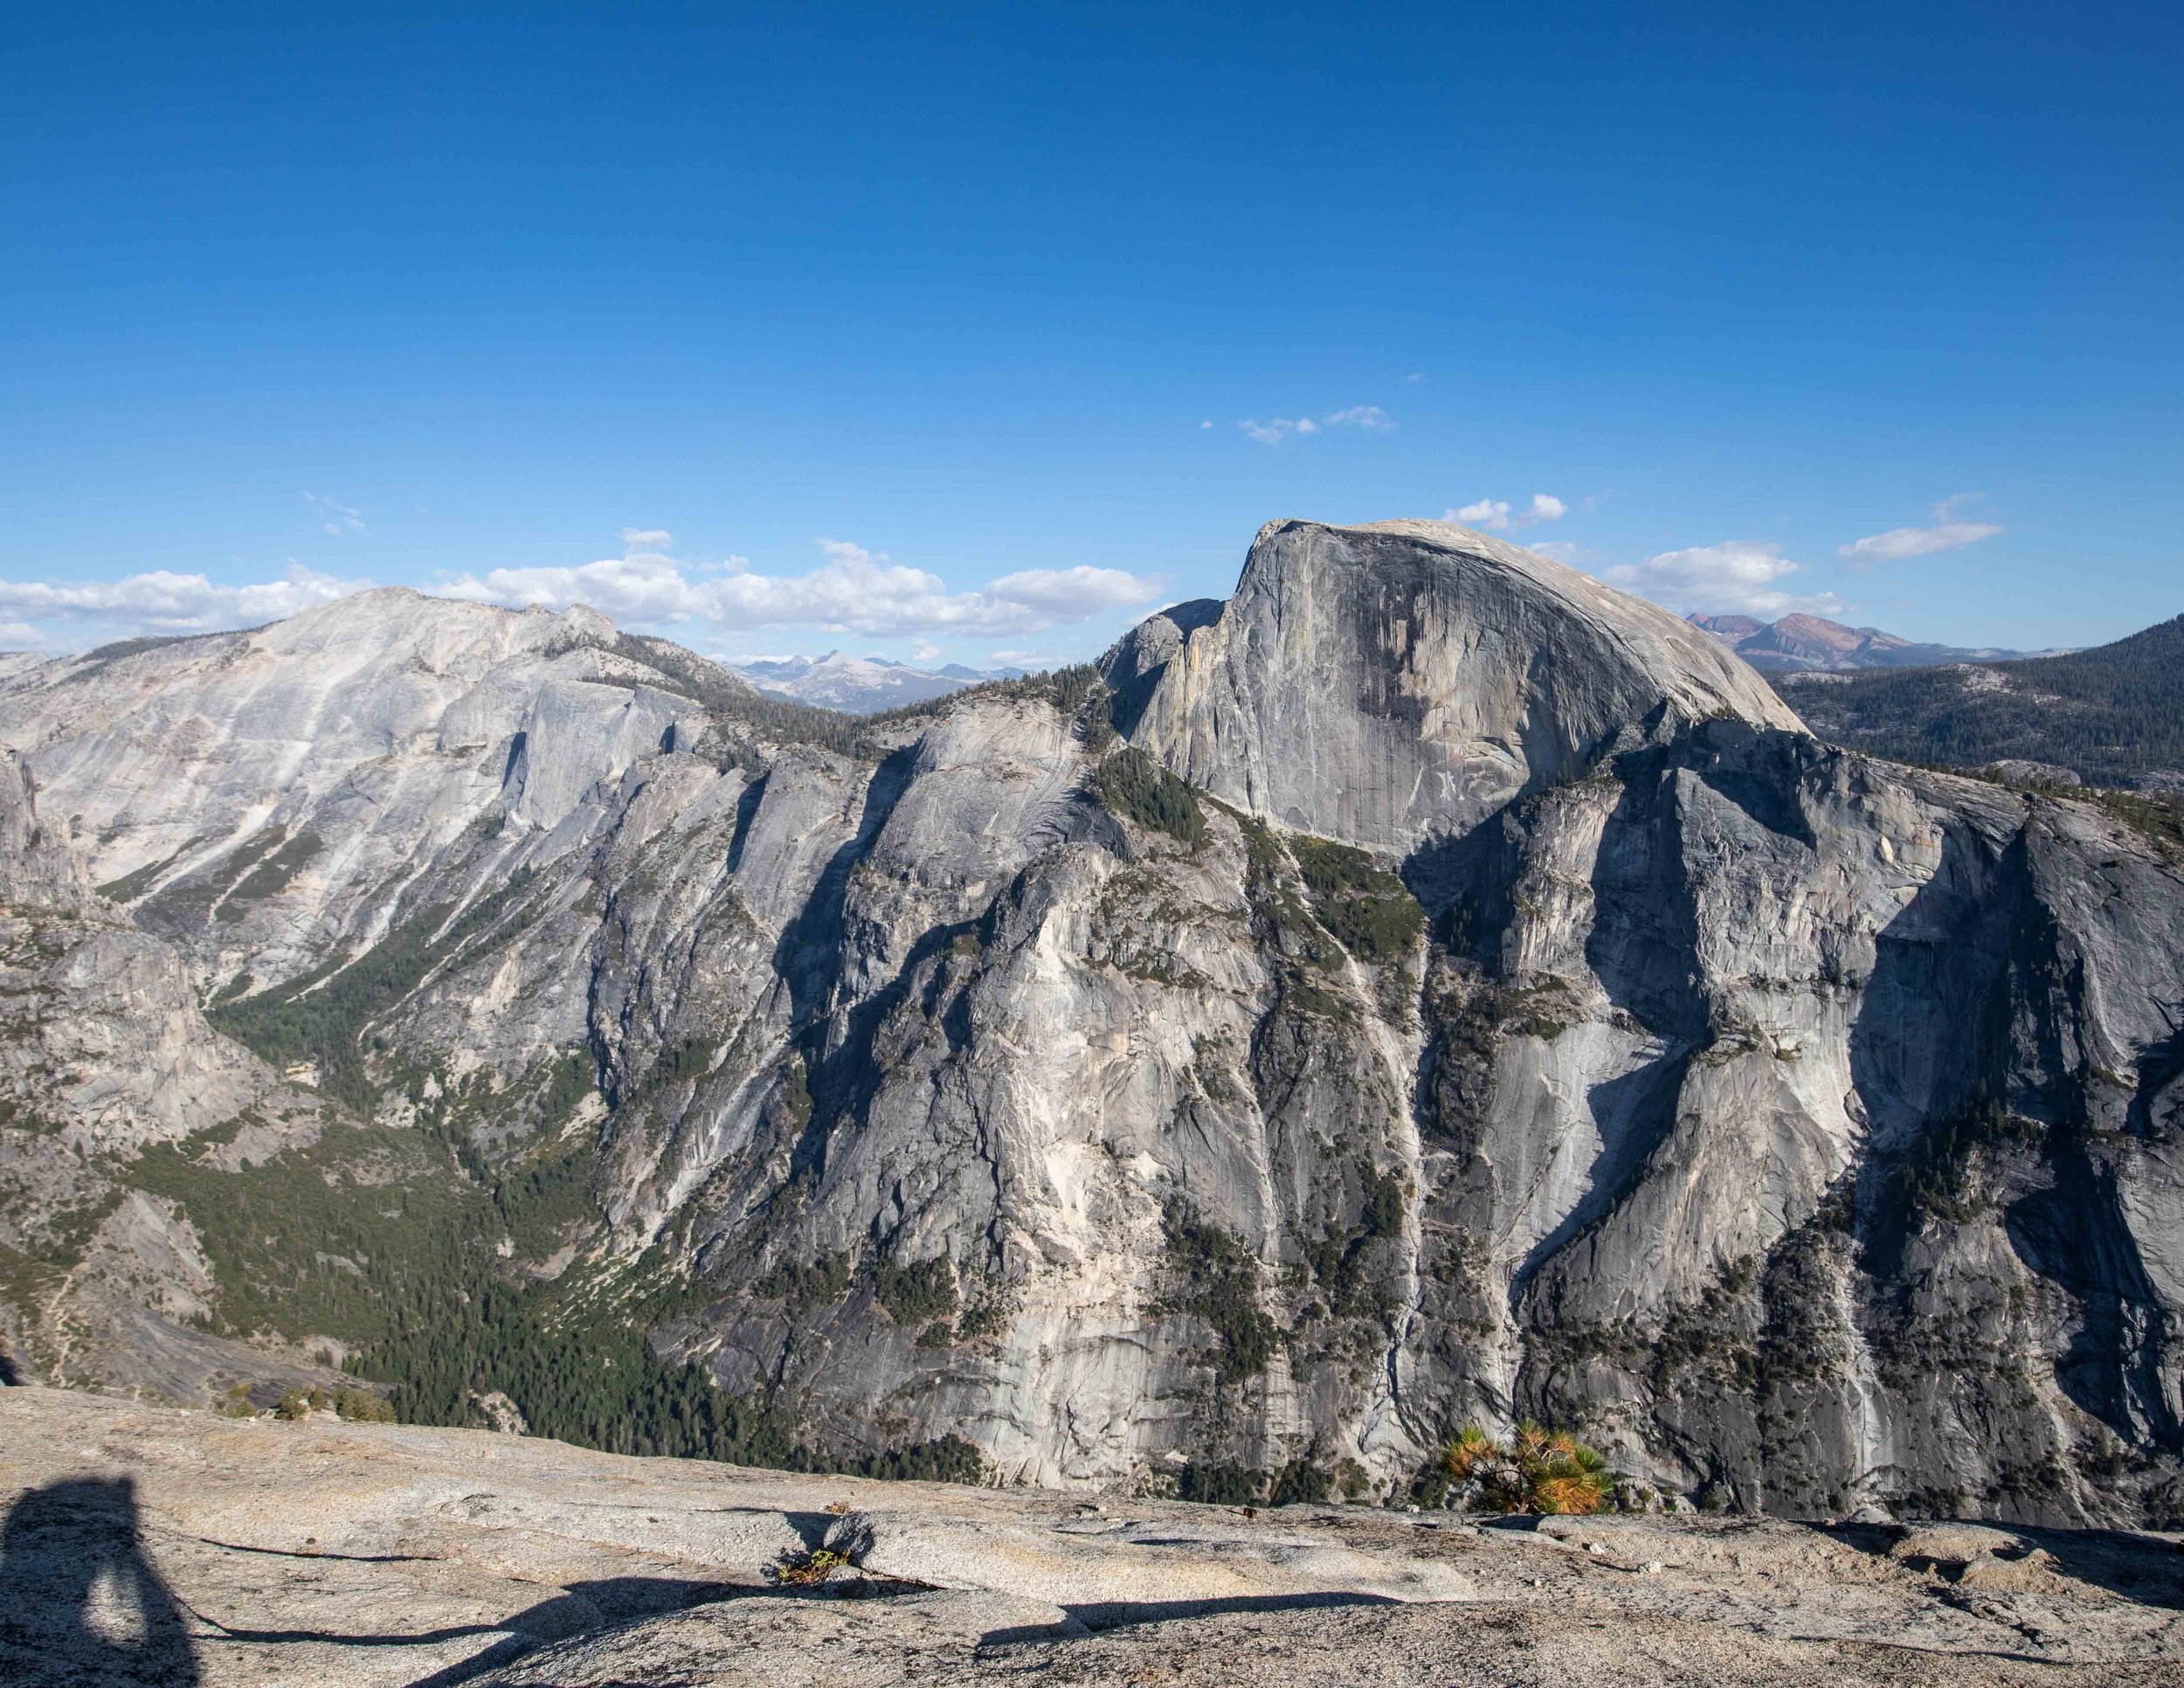
1 - Taft Point
Location: Glacier Point Road
Crowd factor: High
Best time to go: Sunset
Accessible year round: No - closed during winter
Taft Point is definitely one of the greatest photography spots in the entire park. The walk to get to this amazing cliff edge is just over one mile each way and pretty easy.
When you arrive you will have one of the best views of the entire park and feel like you can almost touch the iconic El Capitan.
Yosemite photography spots - the iconic ledge at Taft Point
If you don’t like unfenced cliff edges there is a railed lookout which still offers spectacular views, but most people will head to the cliffside to get those edge of the world shots.
The light is spectacular at sunset but this means a phenomenal amount of people will be there, even when we visited in the off season. If you want to have a peaceful experience you would need to come at sunrise, either way it’s a must for your Yosemite itinerary.
A closer up view at Taft Point
2 - Glacier Point
Location: Glacier Point Road
Crowd factor: High
Best time to go: Sunrise
Accessible year round: No - closed during winter
This is one of the most popular lookouts in the park despite being around an hours drive from the valley floor. Once you get there it’s not hard to see why.
The view of Half Dome and the valley is incredible, and it’s a really short easy walk to get there (less than half a mile and flat). The best time to visit for photography is sunrise. We’d read online that it was a sunset spot but having visited just before sunset we can definitely tell you that it isn’t.
The view from Glacier Point
A ledge near the main viewpoint at Glacier Point
3 - Sentinel Dome
Location: Glacier Point Road
Crowd factor: Low
Best time to go: Sunset
Accessible year round: No - closed during the winter
Given how close Sentinel Dome is from Taft Point (they share the same car park) the difference in crowds is unbelievable.
We shared the summit of Sentinel Dome with just six other people on our visit and the top of the dome is so large that you don’t have any difficulty escaping others and finding your own spot to take photos without anyone else in them.
The views are 360 degrees and you can see both Half Dome and El Capitan.
The most magical time to visit is at sunset, and as the walk is just 1.1 miles each way, you don’t have too far to get back to your car in the dark. Make sure you wait around for twilight which was absolutely beautiful from here and seemed to last for hours!
The star gazing and astro photography opportunity would also be amazing because hundreds were already beginning to appear as we left and that was long before the majority of stars would have been out.
If you love hiking and want to check out other photography spots before visiting Sentinel Dome you can read our full guide to the Sentinel Dome circuit hike.
4 - Tunnel View
Location: Near the Valley Floor
Crowd factor: High
Best time to go: Late afternoon
Accessible year round: Yes
This is probably the most popular viewpoint in Yosemite and I’m not sure anyone visits without taking it in. The fact it is just a few steps from the car park only adds to the popularity. The view encompasses the entire valley and it is a truly beautiful sight, it almost doesn’t look real!
The best time for photography is late in the afternoon, as during the day the glare is pretty intense. Our shot is around an hour before sunset which provided nice even light.
5 - Inspiration Point
Location: Tunnel View / Valley Floor
Crowd factor: Low
Best time to go: Sunset
Accessible year round: Yes - but may be hard to hike to in the winter
If you take one look at the crowds at Tunnel View and decide it’s just not for you then head directly from the Tunnel View parking lot up the trail to Inspiration Point.
At just over 1.25 miles each way and roughly 1000ft elevation gain you will be working for your solitude but when you get to the top and get a similar vista to Tunnel View you won’t regret it. We didn’t have to share this spot with another soul when there were dozens of people just below us at Tunnel View.
The view is slightly more obscured than the grand panorama below but it is still an absolute beauty. We visited for sunset which provided nice light (it was a reverse sunset spot).
6 - El Capitan
Location: Valley Floor
Crowd factor: Low
Best time to go: Anytime
Accessible year round: Yes
If you’ve seen Free Solo then you will probably be even more mesmerised by this spot! The mighty El Cap is an impressive sight by anyone’s standards but what we loved about this spot was that it also offered a great view of the climbers heading up the Nose.
It’s a really short and flat path to get to the viewing area, there are two main spots to get shots of the climbers and we preferred the first one because it was easier to see them from that angle - you’ll know you’re at the right place because though it’s not marked the view is very clear.
You will need a good zoom lens to catch the climbers. We found that a couple who were looking through a normal camera lens couldn’t see them very well.
El Capitan
Climbers on El Capitan
You can get great views of El Capitan from the El Capitan Meadow on the road into the valley. If you want to get really close to see the climbers, then head to the Yosemite Valley Loop (click here to see the location on Google Maps).
7 - Cook’s Meadow
Location: Valley Floor
Crowd factor: Low
Best time to go: Any time
Accessible year round: Yes
There are so many spots around the Cook’s Meadow that are beautiful for photography. Our favourite was one just a few minutes into the meadow which offered a spectacular view of Half Dome and also herds of deer grazing in the foreground.
We visited for sunset which was lovely soft light and also when the deer were more active if you want to catch a couple in your shots.
It’s just a few minutes flat walk to get into the meadows. If you continue on the Sentinel and Cook’s Meadow loop walking trail you will also get the view of Lower Yosemite Falls from the boardwalk (the shot favoured by all Instagrammer’s!). Lower Yosemite Falls were dry on our visit so we can’t show you that one I’m afraid!
8 - Clouds Rest
Location: Tioga Pass
Crowd factor: Moderate
Best time to go: Morning
Accessible year round: No - closed in winter
So this is a biggie and only suitable if you love hiking as well as photography as it’s a fair walk and hefty climb to get to the summit. You will be rewarded with what many describe as the best view in the entire park - we didn’t meet a ranger who didn’t pick this as their favourite trail in the park!
If you are really serious about getting beautiful photos we’ve been told the ultimate time to be at the summit is for sunrise. But as it was over six steep miles to get there we decided just to hike in the middle of the day. We still loved the photos but I know they would have been better with early morning light.
Our favourite spot is on the summit, if you walk almost to the very end you can see a large rock on the edge of the cliff which is a good spot if you want to get a person in your photo.
It looks really precarious but there is a second ledge below the rock so it’s not as bad as it looks.
You can read a detailed guide on what to expect from the hike here.
9 - Half Dome from the Glacier Point Road
Location: At the very end of Glacier Point Road
Crowd factor: Low
Best time to go: Morning
Accessible year round: No - closed in winter
This is another spot which is popular on Instagram and as we had read Glacier Point was a sunset spot we thought this would be too. As you can see from our photo, it isn’t, if you can get here for sunrise that will be by far the best light and we’ve seen some magic shots from here
You can’t park safely beside this exact spot which is the curve in the road just before Glacier Point, so park at the parking lot for the viewpoint and then walk for around five minutes uphill on the trail to the bend in the road.
For the photographer there is a decent amount of space to take photos at the side of the road without having to put yourself in any danger!
Ditto for if you want a person in the short as they can walk on the verge rather than the road itself.
10 - Half Dome Cables
Location: End of the Half Dome hike
Crowd factor: High
Best time to go: Morning
Accessible year round: No - the cables are only up seasonally (usually between May and October weather permitting)
Note that to get to this spot requires a permit. Once you have your permit sorted (which you need to enter a lottery for), it’s roughly a 9 mile walk to reach the infamous cables.
It’s a strenuous hike but worth every last step. After you’ve climbed the Subdome, the final obstacle between you and the base of Half Dome, you’ll see the cables. I’m not going to lie they are pretty darn scary and we didn’t make it all the way to the summit disappointingly but we did did get some classic shots of those incredible cables.
There’s a large area just before the cables that is flat and has lots of rocks to sit on, so capturing the cables is easy and doesn’t require any precarious hiking to reach, that all happens on the cables themselves.
This spot gets really busy so if you want to be here without crowds you need to arrive early which means a super early start for your walk. For reference our photos are taken at around 10.30am and we started the walk shortly after sunrise in fall.
To be honest photography wise I think the people add to the shot but for climbing the cables themselves that’s another matter! Those crowds were scary! You can read more about it in our post on what nobody will tell you about hiking Half Dome.
If you are super keen, sunrise from the summit of Half Dome is supposed to be amazing for photography but that would mean climbing through the night!
11 - Eagle Peak
Location: Towards El Capitan after taking the Upper Yosemite Falls Track
Crowd factor: Low
Best time to go: Morning
Accessible year round: Yes - but may be hard to hike in the winter due to snowfall
We visited Eagle Peak as part of our hike up El Capitan and we can tell you the views are actually better from here than they are from the summit of El Cap. It’s another fairly heft hike but one of the most iconic in Yosemite.
The trail to get to Eagle Peak is roughly 5.7 miles (9.25km) long, just over three miles of which is very steep. After that it flattens out almost until the peak when you will have another short climb and a tiny scramble up the rocks.
12 - Bridal Veil Falls
Location: Valley floor
Crowd factor: High
Best time to go: Any time
Accessible year round: Yes
Bridal Veil Falls is a majestic waterfall and has water all year round - which cannot be said for the majority of falls in Yosemite as we found out in October! The walk is half a mile return on an easy trail so you won’t be schlepping your tripod too far.
At the end of the trail you come out to the base of the falls which offers a good photo opportunity or you can scramble up the rocks for different angles.

Although the falls retains water when others in the park have run dry the best time to photograph them is definitely in spring and summer when the flow is highest.
Just before sunset is a good time to shoot or when the sky is overcast for even light. We also loved shooting Bridal Veil Falls with a zoom lens from Tunnel View when we were lucky enough to see it become a rainbow fall!
13 - Vernal Falls
Location: Valley Floor
Crowd factor: Moderate
Best time to go: Morning
Accessible year round: Yes
Vernal Falls is one of the most famous in Yosemite and particularly incredible if you visit in spring when the waterfalls are pumping (watch your gear though because you do get soaked).
To get to the top of Vernal Falls using the Mist Trail (rather than the John Muir) will be a hike of around 1.25 miles. It is a steep walk and in the spring and summer can be very slippery from all the spray - hence the trail name.

It is definitely worth the effort though. My favourite view of Vernal Falls actually comes before you reach the top though so you could shorten the walk if you wanted to.
As you are making your way up the stone steps you’ll suddenly see the falls looming ahead of you and it provides a great photo op. Catching the falls from the top is harder because there’s a railing and the view is partially obscured.
Light wise the best time is in the early morning, late afternoon or on an overcast day for even light. If you’re lucky all that mist will create rainbows.
14 - Mirror Lake
Location: Valley floor
Crowd factor: Moderate
Best time to go: Afternoon
Accessible year round: Yes - but may have dried up by the fall and could be frozen in winter
We couldn’t miss Mirror Lake from this list even as you can see from our photo it had dried up on our visit! Ordinarily you would get one of the most special views in the park with Half Dome perfectly reflected in the still water.

The spot where Mirror Lake was…..
The best time to photograph the lake is in spring and summer. Early morning, around sunrise is the best time to get still water and therefore the spectacular reflection.
To get to the lake requires a one mile fairly flat easy hike.
15 - Olmstead Point
Location: Tioga Pass
Crowd factor: Low
Best time to go: Sunset
Accessible year round: No - closed during the winter
Due to its location away from the valley floor Olmstead Point is less visited than other Yosemite viewpoints.
We stopped by at sunset and thought the view was beautiful and quite different to any other we’d seen in the park. Although it is at quite a distance you can see the northern side of Half Dome with giant boulders in the foreground.
You can park right beside the viewpoint so there’s no hiking involved making a sunset trip easy.

Packing suggestions for Yosemite
Having the right gear can make a huge difference. Here’s what we pack and have relied upon for years:
Sunscreen: A lot of the trails in Yosemite have very little shade and the sun is brutal most of the year! Check for sunscreen on Amazon or REI
Day Pack: Osprey Talon 22 (we’ve owned this for years). Check on Amazon, REI or direct with Osprey
Hiking Boots: Merrell Moab (for men and women). We’ve both used these for over three years and they just keep going. Check them out on REI or Amazon
Trekking poles: We’ve used Black Diamond for years as they are light, solid and durable. Check out REI or Amazon.
Reusable water bottle: To avoid single-use plastic. Check then out on REI or Amazon
Icebreaker Base Layer: What we always wear in the winter and makes a huge difference for keeping warm. Check out on REI or Amazon
This post may contain affiliate links, meaning at no additional cost to you, that we will earn a small commission if you click through and decide to make a purchase. This helps towards the costs of running our website. :-)
Like it? Pin it!

Follow us on social media
Are you planning a trip to Yosemite? Which is your favourite Yosemite Photography spot? Let us know in the comments below!